雖然這篇Spatula鄉民發文沒有被收入到精華區:在Spatula這個話題中,我們另外找到其它相關的精選爆讚文章
在 spatula產品中有303篇Facebook貼文,粉絲數超過5萬的網紅CANDICE KITCHEN 自家浪漫美食行,也在其Facebook貼文中提到, 【📣割愛大平賣 - part 2】 上次割愛大行動 大家反應太熱烈😆 橫掂執開廚櫃 順便搵多少少心愛嘅LC大割價益吓大家 honey最開心加願望成真 終於可以俾番個儲物空間佢😂😂 再次平價割愛心愛LC及餐具 希望有心人接收佢哋🥺🥺 (Hold) 1. 全新16cm 上火碟(flame) 有盒...
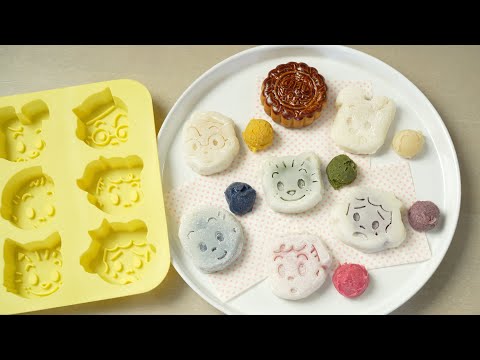
同時也有660部Youtube影片,追蹤數超過304萬的網紅MosoGourmet 妄想グルメ,也在其Youtube影片中提到,@リンネル チャンネル リンネル 11月号増刊 特別付録のオサムグッズのシリコーンケーキ型を使ってスノースキン月餅を作ってみました。見た目はスノースキン感は弱いですが、月餅🥮の型がなくても、シリコン型で作れたのがポイント。伸びのよい柔らかな餅皮とホワイトチョコのミルキー感がとっても合います。包みやす...
「spatula」的推薦目錄
- 關於spatula 在 Elle Onni Instagram 的最佳解答
- 關於spatula 在 Su from Malaysia ?? Instagram 的精選貼文
- 關於spatula 在 Baby Sumo Instagram 的最佳解答
- 關於spatula 在 CANDICE KITCHEN 自家浪漫美食行 Facebook 的精選貼文
- 關於spatula 在 Resepi Mutiara HATI Facebook 的最佳貼文
- 關於spatula 在 Resepi Mutiara HATI Facebook 的最讚貼文
- 關於spatula 在 MosoGourmet 妄想グルメ Youtube 的最佳解答
- 關於spatula 在 生かし屋 IKASHIYA CULINARY ART Youtube 的最讚貼文
- 關於spatula 在 Tasty Japan Youtube 的精選貼文
spatula 在 Elle Onni Instagram 的最佳解答
2021-10-01 19:24:57
小賽從小耳濡目染之下 很熟悉Thermomix 的操作 今天和小賽一起用 Thermomix 做Zui Kuih 這個是我們麻坡人的最愛 講真的如果沒有Thermomix 我是不可能做出來 而且我家裡應該不會有粘米粉這種東西😂 有了Thermomix 後這個料理是我們家常出現的小吃 尤其我阿拔阿...
spatula 在 Su from Malaysia ?? Instagram 的精選貼文
2021-10-01 14:55:15
Yessss! Nak dapat hasil nasi yang:- ✔️ gebu ✔️ seroi, sebutir-sebutir ✔️ tak berkerak ✔️ tak hangit ✔️ terus boleh buat nasi goreng! . Teknologi the...
spatula 在 Baby Sumo Instagram 的最佳解答
2021-09-23 23:53:24
Pan fried salmon fillet, miso soup for lunch today. Crispy skin, yummmmm! I like to eat it with fried garlic oil and soy sauce. How about you? 200g s...
-
spatula 在 MosoGourmet 妄想グルメ Youtube 的最佳解答
2021-09-25 10:18:38@リンネル チャンネル リンネル 11月号増刊 特別付録のオサムグッズのシリコーンケーキ型を使ってスノースキン月餅を作ってみました。見た目はスノースキン感は弱いですが、月餅🥮の型がなくても、シリコン型で作れたのがポイント。伸びのよい柔らかな餅皮とホワイトチョコのミルキー感がとっても合います。包みやすい餅皮なので同量の餡でも包みやすいです。型離れのポイントは打ち粉。片栗粉を型や餅皮の側面に多めに振ってください。くっつかずに作業できます。型に餅が貼り付き、1回、失敗してしまいました。
昔から大好きだったオサムグッズ。付録でシリコン型が手に入るなんていい時代なんだ。
*レシピ*(およそ64mlの型 6個分)
ホワイトチョコ餡を作ります
1.ホワイトチョコ 42gを溶かす。
2.白あん 150gを入れ混ぜる。
3.6等分にする。
4.お好みにパウダーで着色する。
今回、かぼちゃパウダー・紫芋パウダー・いちごパウダー 各2g、バタフライピーパウダー・抹茶 各1gで着色しています。もちろんそのままでもOKです。
5.ラップで丸く包み、冷蔵庫または冷凍庫で冷やしておく。
餅皮を作ります。
6.耐熱ボウルに白玉粉 24g、水 96gを入れ粒がなくなるまで混ぜる。
7.加糖練乳 24g、サラダオイル 24gと上新粉 24g、薄力粉 8g、上白糖 24gをあわせてフルイ入れ、泡立て器で混ぜる。
8.ふんわりラップをして、600wの電子レンジで50秒加熱し泡立て器で混ぜる。
9.その後、20秒加熱を3回繰り返し、その都度、泡立て器で混ぜる。
10.更に20秒加熱を3回繰り返し、その都度、今度はゴムベラで混ぜる。
11.更に今度はラップをしないで、1分30秒加熱し混ぜないでそのまま粗熱を取る。
12.片栗粉を広げたバットなどに(11)を6等分する。
13.ラップの間に(12)を伸ばす。
14.(5)を包む。
15.シリコン型に押し込む。
16.冷蔵庫で冷やす。
17.型から取り出す。
18.でけた。かわいいうまい。オサムグッズかわいい。永遠だな。
I made snow skin mooncakes using the silicone cake mold of OSAMU GOODS. It doesn't look like snow skin, but the key is that it can be made with a silicone mold even if you don't have a mooncake 🥮 mold.The milky texture of the white chocolate goes well with the soft and stretchy rice cake skin. Since it is a rice cake skin that is easy to wrap, it is easy to wrap even the same amount of bean paste. The key to mold release is flour. Sprinkle more potato starch on the sides of the mold and the rice cake skin. You can work without sticking. Mochi stuck to the mold and I failed once. I've always loved OSAMU GOODS. It's a good time to get a OSAMU GOODS silicone mold in a magazine freebie.
* Recipe * (for 6 molds of about 64 ml)
Make white chocolate bean paste.
1.Melt 42g of white chocolate.
2.Mix in 150g of white bean paste.
3.Divide into 6 equal parts.
4.Color with powder as desired. This time, I used 2g each of pumpkin powder, purple sweet potato powder, and strawberry powder, and 1g each of butterfly pea powder and matcha. Of course, you can leave them as they are.
5.Wrap in plastic wrap and chill in the refrigerator or freezer.
Make mochi skin.
6.Put 24g of Shiratamako and 96g of water in a heat-resistant bowl and mix until there are no grains.
7.Add 24g of sweetened condensed milk, 24g of salad oil, 24g of Joshinko, 8g of cake flour, and 24g of white sugar, and mix with a whisk.
8.Wrap it gently, heat it in a 600w microwave oven for 50 seconds, and mix it with a whisk.
9.Repeat heating for 20 seconds 3 times, mixing with a whisk each time.
10.Repeat heating for another 20 seconds three times, each time mixing with a rubber spatula.
11.Furthermore, without wrapping this time, heat for 1 minute and 30 seconds and remove the heat as it is without mixing.
12.Divide (11) into 6 equal parts on a tray with potato starch spread.
13.Spread (12) between sheets of plastic wrap.
14.Wrap (5).
15.Press into the silicon mold.
16.Chill in the refrigerator.
17.Remove from the mold.
18.It's done. Cute and delicious. OSAMU GOODS are eternal.
#SnowSkinMooncakes #recipe #月餅 #作り方 #オサムグッズ #リンネル #雑誌付録![post-title]()
-
spatula 在 生かし屋 IKASHIYA CULINARY ART Youtube 的最讚貼文
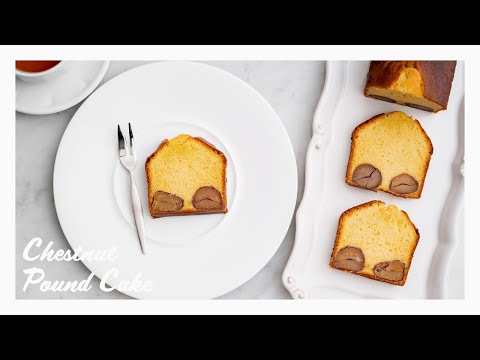
2021-09-25 05:45:01ラム酒香るしっとりほろりな栗の渋皮煮入りパウンドケーキ、栗のテリーヌです
【材料】
18cmパウンド型
・バター 100g
・きび砂糖orグラニュー糖 70g
・はちみつ 15g
・塩 ちょっぴり
・卵黄 2個
・全卵 1個
・薄力粉 60g
・アーモンドパウダー 30g
・ベーキングパウダー 2g
・栗の渋皮煮 8個
・ラム酒 適量
【準備】
・バターを室温で柔らかくする
・パウンド型に敷き紙を敷く
・栗の渋皮煮の表面のシロップをペーパーで拭っておく
・薄力粉、アーモンドパウダー、ベーキングパウダーはふるって使う
・オーブンを170℃に予熱する
【作り方】
1. ボウルに柔らかくしたバター100gをほぐし、泡立て器で砂糖70gをすり混ぜ、はちみつ15g・塩ちょっぴりも混ぜる
2. 卵黄2個を1個ずつ混ぜ、溶いた卵1個分も少しずつ加えて混ぜ合わせる
3. 薄力粉60g・アーモンドパウダー30g・ベーキングパウダー2gをふるい入れ、ヘラに持ちかえてさっくり混ぜ合わせる
4. 粉っぽさがなくなってツヤが出たら半分を敷き紙を敷いたパウンド型に詰め、栗の渋皮煮を並べる
5. 残りの生地を詰めて表面を均し、170℃に予熱したオーブンで40~45分、竹串をさして生地がついてこなくなれば焼き上がり
6. 粗熱が取れたら取り出し、お好みの量のラム酒を刷毛で塗り、ラップに包んで馴染ませて出来上がり
--------------------------------------------------------------------------
【動画でよく使ってる調理器具】
フライパン(20cm):https://amzn.to/2QyY1ny
フライパン(24cm):https://amzn.to/2UtNvz5
フライパン(24cm深型):https://amzn.to/3dj5DEp
鉄フライパン(22cm):https://amzn.to/3a8hqmR
アルミフライパン(24cm):https://amzn.to/3dj6tRz
片手浅型鍋(18cm):https://amzn.to/2QzGXha
片手浅型鍋(21cm):https://amzn.to/2U7ta3o
片手鍋(16cm):https://amzn.to/2QzCj2x
片手鍋(20cm):https://amzn.to/3bd0lZa
ソースパン:https://amzn.to/2U9keuI
まな板:https://amzn.to/2J1fQHI
ガスコンロ:https://amzn.to/3bdtvYa
牛刀:https://www.jikko.jp/fs/jikko/54803
ペティ:https://www.jikko.jp/fs/jikko/54800
撮影機材
カメラボディ:https://amzn.to/2xSXZAd
動画レンズ:https://amzn.to/3t7sfPB
写真レンズ:https://amzn.to/2U7HcCb
録音:https://amzn.to/2U9cGYT
※製品のURLはAmazonアソシエイトのリンクを使用しています
--------------------------------------------------------------------------
▼サブチャンネル(料理実験チャンネル)
https://www.youtube.com/channel/UCqIW0OHh8k2np5ZNz3wz8sg
▼ブログ
http://www.ikashiya.com/
▼Twitter
https://twitter.com/sakihirocl
▼Instagram
https://www.instagram.com/sakiyamahiroshi/
--------------------------------------------------------------------------
↓using translation software.
[Ingredients]
18 cm pound cake mold
・Butter 100 g
・Raw cane sugar or granulated sugar 70 g
・Honey 15 g
・A bit of salt
・Two egg yolks
・One whole egg
・Cake flour 60 g
・Almond powder 30 g
・Baking powder 2g
・Simmered Chestnuts (8)
・Rum, to taste
[Preparation]
・soften butter at room temperature
・Cover the pound cake mold with baking paper.
・Wipe the syrup on the inner skin of the chestnut with a paper towel.
・Sift weak flour, almond powder and baking powder.
・Preheat the oven to 170 °C.
[How to make]
1. Loosen 100 g of softened butter in a bowl, grind and mix 70 g of sugar with a whisk, and mix 15 g of honey and a bit of salt.
2. Mix 2 egg yolks one by one. Add 1 beaten egg little by little and mix.
3. Sift in 60 g of weak flour, 30 g of almond powder and 2 g of baking powder, and lightly mix it together with a spatula.
4. When the powdery feel is gone and the gloss comes out, cover half and stuff it in a pound cake mold covered with paper. Arrange the chestnuts simmered in their inner skins.
5. Stuff the rest of the dough and flatten the surface. Poke it with a bamboo skewer and bake it for 40 to 45 minutes in an oven preheated to 170 °C if the dough doesn't stick then it will be complete.
6. Take it out when it cools down. Brush it with your favorite amount of rum. Wrap it in a plastic wrap and it will be complete.![post-title]()
-
spatula 在 Tasty Japan Youtube 的精選貼文
2021-09-17 08:00:09冷凍パイシートを使って、片手で食べられるミニパイができちゃいます♪
甘酸っぱいミックスベリーパイから、シナモンがきいたアップルパイまで、いろんな味が楽しめます!
焼き上がったらクリームで楽しくデコレーション♪ぜひ作ってみてくださいね!
ミニパイ5種
8人分
材料:
薄力粉(打ち粉用) 30g
冷凍パイシート 2枚
卵 1個
水 大さじ1
■いちごクリームパイ
クリームチーズ(常温) 55g
砂糖 大さじ1
バニラエクストラクト 小さじ1
いちご(みじん切り) 4個
■ミックスベリーパイ
ラズベリー 40g
ブルーベリー 35g
砂糖 大さじ1
レモン汁 大さじ1/2
レモンの皮 小さじ1/2
■チョコバナナパイ
チョコレートスプレッド 75g
バナナ(スライス) 1本
■アップルパイ
青りんご(スライス) 1/2個
ブラウンシュガー 大さじ1
シナモン 小さじ1/8
■トッピング用クリーム
粉砂糖(ふるっておく) 120g
牛乳 大さじ1
バニラエクストラクト 小さじ1/4
作り方:
1. 作業台の上に軽く薄力粉をまぶし、冷凍パイシートを23x30cmの長方形になるまで綿棒で伸ばす。パイシート1枚を3回折り畳み、折り線で8つの長方形を作る。クッキングシートを敷いた天板に載せる。
2. いちごクリームパイのフィリングを作る。小さめのボウルにクリームチーズ、砂糖、バニラエクストラクトを入れて混ぜる。
3. ミックスベリーパイのフィリングを作る。小さめのボウルにラズベリーを入れてフォークでつぶす。ブルーベリー、レモン汁、砂糖、レモンの皮を加えてよく混ぜる。
4. (3)をパイシートの長方形2つの真ん中に載せる。
5. 3つ目と4つ目の長方形にチョコレートスプレッドを塗り、バナナのスライスを載せる。
6. 5つ目と6つ目の長方形に(2)を塗り、いちごを載せる。
7. 7つ目と8つ目の長方形にはりんごのスライスを並べ、シナモンとブラウンシュガーを振りかける。
8. オーブンを200˚Cに予熱しておく。
9. パイに塗る卵液を作る。小さめのボウルに卵と水を混ぜ合わせる。刷毛でパイ生地の折線に沿って塗る。もう2枚目のパイシートを上から被せ、折線に沿ってフィリングの周りの生地を押す。
10. ピザカッター、または包丁で折線に沿って切る。縁にフォークを押し付けて真ん中に穴を3-4ヶ所開ける。表面に卵液を塗る。
11. オーブンで25分焼く。焼き色がついたら取り出し、5分冷ます。
12. トッピング用のクリームを作る。ボウルに粉砂糖、牛乳、バニラエクストラクトを入れ、滑らかになるまで混ぜる。
13. クリームを絞り袋に入れる。パイの表面をクリームでデコレーションしたら、完成!
===
Sheet Pan Stuffed Pastry Pockets
Servings: 8
INGREDIENTS
¼ cup all-purpose flour (30 g), for dusting
2 sheets puff pastry, thawed if frozen
1 egg, beaten with 1 tablespoon water or milk
GLAZE
1 cup powdered sugar (120 g), sifted
1 tablespoon milk
¼ teaspoon vanilla extract
STRAWBERRIES ‘N’ CREAM FILLING
¼ cup cream cheese (55 g), softened
1 tablespoon sugar
1 teaspoon vanilla extract
4 strawberries, stemmed and diced
VERY BERRY FILLING
⅓ cup raspberry (40 g)
⅓ cup blueberry (35 g)
1 tablespoon sugar
½ tablespoon lemon juice
½ teaspoon lemon zest
CHOCOLATE BANANA FILLING
¼ cup chocolate hazelnut spread (75 g)
1 banana, sliced
APPLE PIE FILLING
½ green apple, sliced
1 tablespoon brown sugar
⅛ teaspoon cinnamon
PREPARATION
1. On a lightly floured surface, roll out the puff pastry sheets to 9x12-inch (23x30-cm) rectangles. Set one pastry sheet aside and fold the other in half lengthwise, then in half crosswise twice, to form creases for 8 pockets. Unfold the pastry sheet on the prepared baking sheet.
2. Make the Strawberries ‘n’ Cream filling: In a small bowl, combine the cream cheese, sugar, and vanilla, and mix until smooth.
3. Make the Very Berry filling: In a small bowl, mash the raspberries, then add the blueberries, sugar, lemon juice, and lemon zest. Mix with a fork.
4. Spoon the berry mixture over the center of 2 of the 8 rectangles.
5. Use a spatula to spread the chocolate hazelnut spread over the center of 2 more rectangles, then top with the banana slices.
6. Use a spatula to spread the cream cheese mixture in the center of 2 more rectangles, then top with the strawberries.
7. Place apples slices in the center of the remaining 2 rectangles, then sprinkle with the brown sugar and cinnamon.
8. Preheat the oven to 400˚F (200˚C). Line a baking sheet with parchment paper.
9. Brush the egg wash over the pastry around the edges and between each filling, then top with the remaining puff pastry sheet. Use your fingers to press the pastry down around each filling. Once tightly pressed, use a pizza cutter or knife to cut out each pocket.
10. Seal the outside edges with a fork. Poke the top of each pocket with a fork 3-4 times to ventilate. Brush the tops with egg wash.
11. Bake for 25 minutes, or until golden brown.
12. Make the glaze: In a medium bowl, combine the powdered sugar, milk, and vanilla. Stir until smooth and thick.
13. Remove the pockets from the oven and let cool for 5 minutes. Decorate with the glaze, then serve immediately, or wrap in wax paper and freeze for up to a week. Reheat in the toaster oven.
14. Enjoy!
#TastyJapan
#レシピ
MUSIC
Licensed via Audio Network![post-title]()


spatula 在 CANDICE KITCHEN 自家浪漫美食行 Facebook 的精選貼文
【📣割愛大平賣 - part 2】
上次割愛大行動
大家反應太熱烈😆
橫掂執開廚櫃
順便搵多少少心愛嘅LC大割價益吓大家
honey最開心加願望成真
終於可以俾番個儲物空間佢😂😂
再次平價割愛心愛LC及餐具
希望有心人接收佢哋🥺🥺
(Hold) 1. 全新16cm 上火碟(flame) 有盒 $250
(Hold) 2. 99%新(用過一次) oval plate 30cm (light macaron pink/baby rose blue)有盒 $320/2隻
(Hold) 3. 99%新(用過一次) set of 5 mini oval plates 13cm L@ $280 有盒
(Hold) 4. 9成新wave oval dish (472ml) (satin blue/satin pink) 無盒 $260/2隻
(Hold) 5. 99%新(用過一次) set of 5 chopstick rest $140 有盒
(Hold) 6. 99%新(用過一次) Small flower ramekin (satin blue/yellow) $280/2隻 無盒
*其中黃色ramekin 為l'occitane crossover限量產品
(Hold) 7. 9成新heart ramekin (cassis/pink) $280/2隻 無盒
(Hold)8. 全新Spatula crock (light purple) $160 有盒
9. 全新round trivet (cherry red) $300有盒 (盒有明顯花痕)
(Hold) 10. 99%新(用過一次)27cm oval鑄鐵鍋(cassis) $800 有盒 *最啱用嚟煲湯、燉湯及煲中煲
11. 99%新(用過一次) 34cm paella pan (cherry red) $700 有盒
12. 全新LC叉匙一對及茶格套裝(pink/purple) $280/套
(Hold)13. 全新Mini utensil jar 10cm H (RQ) $100 有盒 *盒有明顯膠紙痕跡
14. 99%新(用過一次) 27cm round plate (棗紅色) $160 有盒 *盒有明顯膠紙痕跡
(Hold)15. 全新Pie bird (black/satin blue) $120/2隻
(Hold) 16. 全新spoon rest (powder pink) $120 有盒
17. 9成新french onion soup bowl 450ml (cassis) $100 無盒
18. 9成新LC x line friends 7-11套裝 $200/套
19. 9成新mini cocotte (Rosemary) $250/兩隻 有盒
完美者勿排
多買優先😊
地鐵荃灣線面交
有興趣歡迎inbox或post下留言😎
spatula 在 Resepi Mutiara HATI Facebook 的最佳貼文
Resepi Kek Pisang :
5 biji pisang dan dilecek
1 cawan gula halus
1 cawan minyak jagung
4 biji telur
1 1/2 cawan tepung gandum*
1 sudu teh baking powder*
1 sudu teh soda bikarbonat*
1 sudu teh esen vanilla
1 sudu teh perisa pisang – boleh tak nak letak
Cara-cara buat resepi kek pisang hanya guna spatula ni :
#1: Ayak bahan bahan yang bertanda .Untuk kek yang naik sekata dan bukan di bahagian tertentu seperti di tengah atau tepi, seelokknya ayak 2-3 kali untuk semua bahan tersebar rata dan sebati.Ketepikan
Macam-macam versi kek ni. Ada yang suka resepi kek pisang bakar yang lagi harum mewangi semerbak bau pisang ketika dibakar dalam oven. Memang menggiurkan. Tapi
#2: Panasakan dulu oven pada suhu 160’C lebih kurang 10 minit. Pukul telur bersama gula dan minyak hingga adunan kembang dan bertukar warna menjadi putih. Tambahkan pisang yang siap dilecek hingga hancur tadi. Kacau guna spatula sahaja. Resepi kek pisang simple ni memang pakai ni ja.
#3: Masukkan tepung yang diayak sedikit demi sedikit dan adun sebati dengan spatula. Guna loyang size 7 atau 8 inci.Sapu mentega + tepung ke semua bahagian tepi dan untuk lapisan bawah , boleh alas dengan baking paper.
#4: Bakar pada suhu 160’C atau ikut oven masing-masing .Bila bahagian atas dah nampak perang, turunkan suhu 140 dan guna bahagian bawah sahaja . Tapi kalau nak guna api atas bawah pun boleh, ada tips dia. Tutup lapisan atas dengan aluminium foil sekadar tutup.Jangan ketatkan .Baru lah cantik lapisan atas kek pisang tu.
#5: Bakar lebih kurang 30-40 minit sehingga kek masak. Bila dah masak , keluarkan kek dan biarkan sejuk.
Kalau ikut tips dan cara camni, memang puas hati lah tengok hasil kek pisang sukatan cawan ni. Selamat mencuba tau.
spatula 在 Resepi Mutiara HATI Facebook 的最讚貼文
Memang besar, sangat moisssst, dan sedap sangat kek tok. So, inilah resipinya kmk pakei resepi sis Noy Yullan . Berbaloi dan puas ati. 😊👍
Bahan-Bahan:
16 oz mentega (454gm pure butter)
2 gelas gula halus (saya letak 200gm)
10 biji telur gred A (saya guna AA)
1 tin susu pekat (saya letak 350gm)
200gm kaya
1 bungkus coklat masakan (saya letak 200gm)
2 sdk esen vanila
2-3 sudu browning sugar (gula hitam Sarawak)
* 2 gelas tepung gandum (saya letak 200gm)
* 200gm horlick perisa asli
* 100gm horlick perisa coklat (Saya guna serbuk minuman malt coklat jenama Econsave)
* 50gm serbuk Koko
* 60gm Milo
(Satukan dan ayak bahan bertanda *)
Cara-Cara:
1. Cairkan coklat masakan secara double boiler atau masukkan dan cairkan dalam microwave. Ketepikan.
2. Pukul mentega dan gula sehingga bertukar putih dan gebu.
3. Masukkan telur satu per satu. Pukul hingga kembang.
4. Masukkan susu pekat, kaya, coklat masakan yang sudah dicairkan tadi, esen vanilla dan browning sugar. Pukul sehingga adunan sebati dan gebu.
5. Perlahankan mixer, masukkan tepung gandum, horlicks, serbuk koko, dan Milo sedikit demi sedikit. Putar sekadar sebati sahaja.
6. Matikan mixer. Kaub balik adunan dengan menggunakan spatula.
7. Sediakan loyang saiz 10" (boleh guna 9" tapi agak tersembul masa mula masak. Dah sejuk kang, kek tu turun sedikit 😊). Alas dasarnya dan sapu mentega pada bahagian dalam loyang. Masukkan adunan. Hentak2 sedikit loyang tadi bagi meratakan adunan. Tutup permukaan loyang dengan aluminium foil. Kukus sehingga masak. Anggaran 3 hingga 4 jam bergantung pada suhu kukusan masing2.