雖然這篇Smoothen 中文鄉民發文沒有被收入到精華區:在Smoothen 中文這個話題中,我們另外找到其它相關的精選爆讚文章
在 smoothen產品中有192篇Facebook貼文,粉絲數超過8,187的網紅Siennylovesdrawing,也在其Facebook貼文中提到, Yeah‼️ While #stayhome 🏡 not to forget to pampering self & be pretty, including #nailcare 🥰 Sienny Yong aka Siennylovesdrawing 👩🏻 is gonna sharing he...
同時也有12部Youtube影片,追蹤數超過4,010的網紅ebaracm,也在其Youtube影片中提到,Yield : 10-11 buns 【Ingredients】 ■Bun Bread Flour 1½ cup Salt ½ tsp Honey 1 tbsp Instant Yeast ½ cup Warm Milk 1 tsp Softened Butter 1 tbsp ■Japanese...
「smoothen」的推薦目錄
- 關於smoothen 在 Hannah Chia Instagram 的精選貼文
- 關於smoothen 在 Sherry Saw 雪心 Instagram 的最讚貼文
- 關於smoothen 在 Scha Alyahya™ Instagram 的最佳貼文
- 關於smoothen 在 Siennylovesdrawing Facebook 的精選貼文
- 關於smoothen 在 Facebook 的最佳貼文
- 關於smoothen 在 SCXKL Facebook 的最佳解答
- 關於smoothen 在 ebaracm Youtube 的最佳貼文
- 關於smoothen 在 Rasaflix Youtube 的最讚貼文
- 關於smoothen 在 Tasty Japan Youtube 的最佳貼文
smoothen 在 Hannah Chia Instagram 的精選貼文
2021-09-24 12:18:47
Taking time to explore Singapore and taking good care of my hair and skin. Currently adding @sg.byonesii Smooth Repair Essence to my regular shampoo ...
smoothen 在 Sherry Saw 雪心 Instagram 的最讚貼文
2021-09-24 12:07:01
I like this 3-in-1 moisturiser, anti-aging and natural UV Protection up to SPF30. This can also helped against pigmentation. I like using as it's also...
smoothen 在 Scha Alyahya™ Instagram 的最佳貼文
2021-09-24 09:04:02
I’ve just learnt that stronger hair starts with having a healthy scalp! I alternate between the Gentle & Balance Micellar Shampoo by @loccitanemy made...
-
smoothen 在 ebaracm Youtube 的最佳貼文
2021-01-15 12:01:38Yield : 10-11 buns
【Ingredients】
■Bun
Bread Flour 1½ cup
Salt ½ tsp
Honey 1 tbsp
Instant Yeast ½ cup
Warm Milk 1 tsp
Softened Butter 1 tbsp
■Japanese Curry Filling
Chopped Yellow Onion 17g
Grated Ginger 1g
Chopped Garlic 2g
Potato Cubes 23g
Carrot Cubes 35g
Water ⅛ cup
Minced Chicken 100g
Ketchup ¼ tbsp
Soy Sauce ¼ tbsp
Grated Apple 30g
A pinch of Salt
Water 212g
Ebara Curry Flake 75g
Sugar 5g
Apple Cider Vinegar 10g
Salt 2g
■Assembling
Breadcrumbs 150g
Egg 1 nos
Mozzarella Cheese 220g
【Steps to cooking】
1. i. Mix bread flour, warm milk, honey, instant yeast, and salt into a mixing bowl.ii. Knead for around 10 minutes.iii. Add in softened butter and knead for another 5 minutes.iv. Place dough into a greased bowl.
v. Seal and set to rise.
2. i. Sauté chopped onion until golden brown.ii. Add in grated ginger, chopped garlic, carrot cubes, potato cubes, and water.iii. Let simmer until no more water left.iv. Add in minced chicken and salt.v. Stir fry until minced chicken is cooked.
vi. Add in ketchup, soy sauce and grated apple.vii. Mix well until fillings are even.
3. i. Add in water, and boil for 15 minutes.ii. Add in salt, sugar, apple cider vinegar, and Ebara curry flake.iii. Stir until thick.
4. i. Portion dough to 35g each.ii. Spread dough to 11cm diameter.
iii. Put 20g Japanese curry filling and 20g mozzarella cheese onto the dough.iv. Wet dough edge with egg.v. Fold dough edge inwards.vi. Smoothen the edges with egg.vii. Coat bun with egg and breadcrumbs.viii. Deep fry for 4 minutes (180°C).
ix. Place Japanese Curry Bun on a wire rack to drain excess oil.x. Ready to serve.![post-title]()
-
smoothen 在 Rasaflix Youtube 的最讚貼文
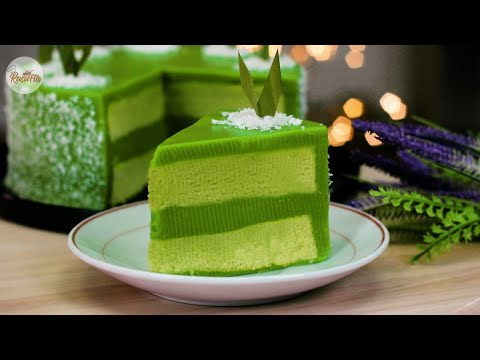
2020-10-19 12:00:34Yummynya tengok kek pandan ni..teksturnya yang licin ni memang menarik betul..rasa lembut dan lemak berkrim pula memang sedap la kalau dimakan waktu sejuk-sejuk..nak buat pun tak susah tau ??
Resepi Kek Lapis Kastad Pandan Gebu | Soft Custard Pandan Layer Cake Recipe
//Bahasa Melayu
--------------------------------------------------------------------------------------------
Bahan-bahan (Adunan Pandan)
4 kuning telur
1/4 cwn gula kastor
1/4 cwn minyak jagung
1/4 cwn pes pandan + sedikit air
1 1/4 cwn tepung naik sendiri
1 sk serbuk penaik
Bahan-bahan (Adunan Telur)
4 putih telur
1/4 sk serbuk tartar
Bahan-bahan (Adunan Kastad)
400 ml santan
200 gm pes pandan + sedikit air
600 ml air
1/2 cwn gula kastor
10 gm serbuk agar-agar
100 gm tepung jagung
1 sk garam
1 sk pewarna hijau
Cara memasak
1. KEK PANDAN: Campurkan telur kuning bersama gula kastor. Kacau campuran menggunakan pemukul telur sehingga gula larut.
2. Tambahkan pes pandan, minyak jagung, tepung naik sendiri sedikit demi sedikit dan serbuk penaik. Kacau rata dan ketepikan.
3. Pukul putih telur hingga berbuih kecil dan masukkan serbuk tartar. Teruskan memukul sehingga soft peak.
4. Masukkan campuran putih telur dan serbuk tartar yang telah dipukul sedikit demi sedikit ke dalam adunan kek. Gaul perlahan hingga sebati dengan menggunakan teknik kaup balik.
5. Tuangkan adunan ke dalam loyang bulat bersaiz 7 inci yang beralaskan baking paper.
6. Panaskan ketuhar pada suhu 170°C. Bakar selama 25-30 minit.
7. Biarkan kek sejuk dan potong kepada dua lapisan.
8. ADUNAN KASTAD: Satukan kesemua bahan dan kacau sebati.
9. Masak adunan menggunakan api perlahan sehingga pekat.
10. Apabila adunan kelihatan berkilat, tutupkan api dan ketepikan.
11. KEK LAPIS PANDAN: Tuangkan adunan kastad ke dalam loyang dan ratakan menggunakan spatula.
12. Kemudian, lapiskan kek di atasnya dan tambahkan satu lagi lapisan adunan kastad. Ulang langkah yang sama pada lapisan kek kedua.
13. Biarkan kek di dalam peti sejuk selama 3-4 jam sebelum dihidangkan.
14. Hiaskan kek dengan serbuk kelapa kering dan hirisan daun pandan.
//English
--------------------------------------------------------------------------------------------
Ingredients (Pandan Mixture)
4 egg yolks
1/4 cup of castor sugar
1/4 cup of corn oil
1/4 cup of pandan paste + bit of water
1 1/4 cups of self-raising flour
1 tsp of baking powder
Ingredients (Egg Mixture)
4 egg whites
1/4 tsp of tartar powder
Ingredients (Custard Mixture)
400 ml coconut milk
200 gm pandan paste + bit of water
600 ml water
1/2 cup of castor sugar
10 gm jelly powder (agar-agar)
100 gm corn flour
1 tsp of salt
1 tsp of green food coloring
Cooking methods
1. PANDAN CAKE: Mix egg yolks with sugar. Stir them using a whisk until the sugar is dissolved.
2. Then, add in pandan paste, corn oil, self-raising flour bit by bit and baking powder. Stir them well and set aside.
3. Beat egg whites forming small bubbles and add in tartar powder. Continue to beat until soft peak.
4. Add in beaten egg white and tartar powder into cake batter bit by bit. Slowly fold them using folding-technique until well combined.
5. Pour the batter into a 7-inch round baking pan lined with baking paper.
6. Preheat the oven at 170°C. Bake for 25-30 minutes.
7. Let it cool and cut into 2 layers.
8. CUSTARD MIXTURE: Combine all ingredients and stir well.
9. Cook over low heat until thicken.
10. When the custard appears shiny, turn off the heat and set aside.
11. PANDAN LAYER CAKE: Pour custard mixture into a baking pan and smoothen using spatula.
12. Then, place a layer of cake over it and add in one more custard mixture layer. Repeat the same steps on second layer cake.
13. Chill the cake inside the refrigerator for 3-4 hours before serve.
14. Decorate the cake with dried coconut flakes and sliced pandan leaves.
Nak resepi lagi?
Sertai Telegram Rasaflix di
https://t.me/rasaflix
#kek #kekpandan #keklapispandan #keklapis #kastad #dessert #recipe #resepi
#kisahdunia #rasaflix
#lemankakap #kdboom #nntaca #makenon![post-title]()
-
smoothen 在 Tasty Japan Youtube 的最佳貼文
2020-07-26 10:00:04チーズケーキにつやつやミラーグレーズをかけて…
まるで小宇宙のような、美しいチーズケーキの完成です。
お店のケーキと引けを取らないビジュアル! ぜひ挑戦してみてくださいね♪
ギャラクシーチーズケーキ
直径7cmドーム型 6個分
材料:
■レアチーズケーキ
クリームチーズ(室温に戻す) 150g
グラニュー糖 30g
ヨーグルト(無糖) 100g
生クリーム 80ml
レモン汁 小さじ1
ゼラチン 5g
水 大さじ2
ビスケット 6枚
■ミラーグレーズ
ホワイトチョコレート(刻む) 150g
グラニュー糖 100g
練乳 100g
水 70ml
ゼラチン 10g
水 大さじ2
食用色素(青・水色) 適量
銀粉 適量
作り方:
1.レアチーズケーキを作る。生クリームはハンドミキサーでとろりとするまで泡立てる。
2.別のボウルにクリームチーズを入れてゴムベラでなめらかになるまで練り混ぜる。砂糖を加えてさらに混ぜ、ヨーグルト、(1)、レモン汁を加えて混ぜ合わせる。
3.ゼラチンを水に振り入れてふやかし、600Wの電子レンジで10秒ほど温めて液状にし、(2)に加えて混ぜる。
4.シリコン型に等分に流し入れ、ビスケットをのせ、冷凍庫で冷やし固める。食べる2〜3時間前に型から外し、冷蔵庫で解凍する。
5.ミラーグレーズを作る。ゼラチンを水に振り入れてふやかし、600Wの電子レンジで20秒ほど温めて液状にする。
6.鍋にグラニュー糖、練乳、水を入れてかき混ぜ、中火にかける。沸騰直前に火からおろし、(5)のゼラチン液を加えて混ぜる。
7.ボウルにホワイトチョコレートを入れて(6)を加え、泡立て器でなめらかになるまで混ぜ、ザルで濾して2等分にする。
8.片方に青の食用色素を加えて混ぜ、もう片方に水色の食用色素を加えて混ぜる。水色の液を青色の液に加えてスプーンでマーブル状に色付けし、とろみが付くまで粗熱を取る。
9.(4)のケーキに(8)をかける。仕上げに銀粉を散らしたら、完成!
===
Here is what you'll need!
---
Galaxy Cheesecake
Servings:6(7cm dome silicone mold)
INGREDIENTS
■No-bake cheesecake
150g cream cheese (at room temperature)
30g granulated sugar
100g yogurt (unsweetened)
80ml fresh cream
1 teaspoon lemon juice
5g gelatin
2 tablespoons water
6 biscuits
■Mirror glaze
150g white chocolate (chopped)
100g granulated sugar
100g condensed milk
70ml water
10g gelatin
2 tablespoons water
Some food coloring (blue, light blue)
Some edible silver powder
PREPARATION
1. To make no-bake cheesecake, whisk fresh cream to very soft peaks.
2. In separate bowl, stir cream cheese until smooth with a rubber spatula. Add sugar, yogurt, fresh cream (1) and lemon juice and combine.
3. Dissolve gelatin in water, microwave at 600W for 10 seconds to liquefy. Pour into cream mixture (2).
4. Pour the cream into silicon molds, place biscuits, and freeze. Move to refrigerator a few hours before serving to unfroze.
5. To make mirror glaze, dissolve gelatin in water, microwave at 600W for 20 seconds to liquefy.
6. Heat granulated sugar, condensed milk and water in a pan over medium heat. Remove the pan from the heat right before boiling. Add gelatin (5) and mix.
7. In a bowl, whisk white chocolate and (6) until smooth. Pour through a fine mesh strainer in a larger bowl to completely smoothen. Divide into two bowls.
8. Color one bowl of the chocolate with blue food coloring, and the other with light blue. Pour light blue chocolate into the blue one. Using a spoon, stir to make marble pattern. Let cool until thicken.
9. Pour marble chocolate (8) over cheesecakes (4). Sprinkle with edible silver powder.
10. Enjoy!
---
Check us out on Twitter! https://twitter.com/TastyJapan
Check us out on Instagram! https://www.instagram.com/tastyjapan/
#TastyJapan #レシピ
MUSIC
Licensed via Audio Network![post-title]()


smoothen 在 Siennylovesdrawing Facebook 的精選貼文
Yeah‼️ While #stayhome 🏡 not to forget to pampering self & be pretty, including #nailcare 🥰
Sienny Yong aka Siennylovesdrawing 👩🏻 is gonna sharing here her #userexperience again with Herbbies : Apothecary Skincare from Mother Earth 💚🌿🌱, a local Malaysian 🇲🇾 small business with organic plants 🌿🌱 infused herbal skincare oil (Ie. soaking dried herbs in plant oil for at least 4 weeks)
This is my 2️⃣nd order to #supportlocal on anti itchy series & cuticle oil , do read more of her 1️⃣st user experience with its HEAL series via 🌐 https://siennylovesdrawing.wordpress.com/2020/07/14/user-experience-heal-series-of-herbbies-skincare/
Do read more of her #userstory for #Mugwort #CuticleOil (5ml) comes with a brush applicator for easy & clean cuticle oil application. Just apply to cuticle area after washing hands, massage cuticle area to facilitate absorption. Apply at least 2-3 times for best results
You may apply to nail & cuticle area for protection before applying nail polishing too as it helps to protect fragile cuticle from harsh nail polish & to strengthen nails. It also helps to smoothen the application of nail polish
Do read more of her #beauty #skincare #userstory soon via 🌐 https://siennylovesdrawing.wordpress.com/category/beauty-personal-care/
#tiktok clip via 📹🌐 https://vt.tiktok.com/ZSJW2wAJM/
Continuous user experience IG stories & highlight album 📸📹 named Herbbies on her IG profile @simplestraightforward
#herbbies #herbalskincare #selfcare #selflove #acnecare #acne #eczema #skinrash #organicskincare #herbalskincare #apothecaryskincare #herbalinfusedoil #healthy #healthylifestyle #lifestyle #beauty #sensitiveskin
smoothen 在 Facebook 的最佳貼文
I’ve just learnt that stronger hair starts with having a healthy scalp! I alternate between the Gentle & Balance Micellar Shampoo by @loccitanemy made from prebiotics for a balanced scalp, then then smoothen out damaged hair with the Intensive Repair Shampoo 75ml rich in repairing essential oils and oat amino acids on the next day.
#AlternateShampooHabit #LOccitaneHairCare #HealthierScalp #SmootherHair #loccitanemalaysia
smoothen 在 SCXKL Facebook 的最佳解答
🎁 GIVEAWAY 🎁
@nanojapan_my Nano Detox Enzyme
Due to busy working schedule it's hard for me to have balance diet with enough consumption of nutrients. Recently I’ve been introduced to the Nano Detox Enzyme that consist of 219 types of raw enzymes that could provide nutrients and help to flush off toxins accumulated in our body!
Been taking this green juice daily for a week now, sometimes as meal replacement as well. I love how it taste just like fruit juice and the best part is it does really help to smoothen my “toilet journey”. If you’re facing similar problem as me, you must try this.
Keen? Join my NANO JAPAN Giveaway with simple steps below:
1️⃣ Follow @nanojapan_my & @scxkl_sammy
2️⃣ Like Nano Japan MY official Facebook page
3️⃣ Leave a comment below & tag 1 friends (every comment is a new entry)
*BONUS: Screenshot step 1 & 2 to @nanojapan_my
*BONUS: Share this post to IG story, tag @nanojapan_my
(mention: Sammy Giveaway)
Winners will be selected randomly and announced within 1 week.
Last day of entry submission is【26 Sept 2021, 11:59pm】
*T&C applies.
.
.
.
.
.
.
#SCXKL #Lifestyle #nanojapanmy #madeinjapan #nanodetoxenzyme #Detoxifying #eatclean #enzyme #greenjuice #ShopeeMY #LazadaMY #qoo10my #caringpharmacy #nanojapangiveaway