雖然這篇Parchment paper鄉民發文沒有被收入到精華區:在Parchment paper這個話題中,我們另外找到其它相關的精選爆讚文章
在 parchment產品中有118篇Facebook貼文,粉絲數超過9萬的網紅Rabbitfoot CO,也在其Facebook貼文中提到, 🤘 這是兔兔兔老闆,更多商品及商品資訊都在 Rabbitfootco.com ,也可以直接私訊,不用客氣,無法24小時在線,但一定都會盡快回覆。 我的IG,帳號: RBFT5422 IG傳送門➡️ https://www.instagram.com/RBFT5422/ #兔兔兔老闆 #Rabbit...
同時也有587部Youtube影片,追蹤數超過0的網紅cook kafemaru,也在其Youtube影片中提到,秋の楽しみと言えば、美味しいものが沢山あること! それから空気が澄んでいること! 空気までも美味しい秋~♡ そしてスイーツも美味しいのです。 ベイクドも気温の上がる日中をのぞけば、涼しくなってきて、楽しいひと時に。オーブンを覗き込みながら、焼き上がりをワクワクしながら待ちます。 ダイエットは次からだ...
「parchment」的推薦目錄
- 關於parchment 在 RogerTheRabbit Instagram 的精選貼文
- 關於parchment 在 Serena | Seattle & Homecook Instagram 的最佳解答
- 關於parchment 在 g i a h â n Instagram 的最佳貼文
- 關於parchment 在 Rabbitfoot CO Facebook 的最佳解答
- 關於parchment 在 TEEPR 亮新聞 Facebook 的精選貼文
- 關於parchment 在 蘋果新聞網 Facebook 的精選貼文
- 關於parchment 在 cook kafemaru Youtube 的最佳解答
- 關於parchment 在 糖餃子Sweet Dumpling Youtube 的最佳貼文
- 關於parchment 在 cook kafemaru Youtube 的最讚貼文
parchment 在 RogerTheRabbit Instagram 的精選貼文
2021-09-24 04:01:19
🤘 這是兔兔兔老闆,更多商品及商品資訊都在 Rabbitfootco.com ,也可以直接私訊,不用客氣,無法24小時在線,但一定都會盡快回覆。 #兔兔兔老闆 #RabbitFootCo #兔腳農場 - 🎗 Converse Chuck 70 Ox "Parchment" 162062C - 🎗尺...
parchment 在 Serena | Seattle & Homecook Instagram 的最佳解答
2021-09-16 02:34:14
#homemade Theses Almond Chocolate Cookies 🍫 are buttery, crunchy, nutty, and full of chocolate-y taste. Ingredients: - 80g unsalted butter, softene...
parchment 在 g i a h â n Instagram 的最佳貼文
2021-09-15 22:48:23
Healthy Sweet Potato Brownies 🍠🍫 My favourite kind of brownies. Super fudgy, naturally sweet and much healthier than typical brownies. Give it a try, ...
-
parchment 在 cook kafemaru Youtube 的最佳解答
2021-09-21 09:49:08秋の楽しみと言えば、美味しいものが沢山あること!
それから空気が澄んでいること!
空気までも美味しい秋~♡
そしてスイーツも美味しいのです。
ベイクドも気温の上がる日中をのぞけば、涼しくなってきて、楽しいひと時に。オーブンを覗き込みながら、焼き上がりをワクワクしながら待ちます。
ダイエットは次からだ~^^
レシピは下にあります↓
フォロー&いいね! も お願いします!!!!!!
twitter
https://twitter.com/cookkafemaru
instagram
https://www.instagram.com/kafemaru/?hl=ja
Blogブログ始めました。
良かったら遊びにきてください^^
https://ameblo.jp/28280807
==================================================
大人気YouTuber “cook kafemaru”の
「罪深いスイーツ」
Amazonはこちらから購入できます↓↓↓
https://www.amazon.co.jp//dp/4046048948/
「世界一作りやすいおうちスイーツ 」
https://www.amazon.co.jp/dp/4046045116/
もしもお住いの近くの本屋さんになかったら、セブンイレブンの
オムニ7でネット予約し、セブンイレブン店頭受け取りで買うことができます!
=============================================
【Ingredients】15cm round Cake Tin
crust:
60g Whole Wheat Biscuits
30g melted Salted butter
1tsp Milk
filling:
200g Cream cheese
60g Granulated sugar
2 Eggs 100g (room temperature)
2 tbsp Flour
100g Heavy Whipping cream (35% fat)
2 tsp Lemon juice
【Directions】
Preparation:
Line the cake pan with parchment paper.
Preheat the oven to 170℃(338°F)
①Mix the crushed biscuits with the melted butter and milk.
②Press the crumb mixture into base of tin.
③Add granulated sugar to the cream cheese and then mix until smooth.
④Add egg,sifted flour,heavy cream, lemon juice in that order.
⑤Pour the filling into the tin.
⑥Bake the cake for 55min.It's all done!
***I recommend to let the cake cool in the tin. When it is cool (room temperature), take out from tin. Place in the fridge to chill for better texture
Let sit in the fridge overnight, and it'll be so delicious the next day♪
***れしぴ置き場***
【材料】15cm 丸型(底取れ)
クラスト:
ビスケット(おススメは全粒粉)
溶かしバター (有塩)30g
塩っ気が合うので有塩バターおススメ
牛乳 小さじ 1
フィリング:
クリームチーズ 200g
グラニュー糖 60g
卵 2個 100g (室温)
薄力粉 大さじ 2
生クリーム (乳脂肪分35%) 100g
2 tsp Lemon juice レモン汁 小さじ 2
【作り方】
準備:卵は室温に戻し、よく溶いておく。
型の底と側面にクッキングシートを敷いておく。
オーブンを170℃に温めておく。
①砕いたビスケットと溶かしたバター、牛乳を混ぜる。
***ビスケットはできれば麺棒などで細かくつぶしておくと、焼成後に崩れにくくなります。
②砕いたビスケットを型の底に押し込む。使うまで冷蔵庫に入れておく。
③クリームチーズは600w電子レンジで30秒加熱し、グラニュー糖を加え、なめらかになるまで混ぜる。
④卵、薄力粉、生クリーム、レモン汁の順に加えてその都度よく混ぜる。
⑤型に流し込む。
⑥170℃に温めたオーブンで55分焼いて出来上がり!
***オーブンの機種によっては55分焼いても上に焼き色がつかないことも。無理にこれ以上焼かずに、トースターやグリルなどを使って上に焼き色を付けましょう。
●焼き上がり後はそのまま型ごと冷まし、冷めたら(常温)、型から取り出します。
一晩冷蔵庫で休ませるとより美味しくなります。
●クリームチーズは必ず柔らかくしてから、材料を混ぜましょう。
冷蔵庫から出したてを無理やり混ぜると、うまく混ざりきらずに
ダマになります。
よりクリーミーな食感にしたいときは、材料を混ぜてからザルなどで濾しましょう。
●カットは熱湯をくぐらせ温めた包丁の水分をふき取りカットします。一切れごとに面倒でも繰り返します。
完全に冷めてからカットしないと、ボトムが崩れますのでご注意ください。![post-title]()
-
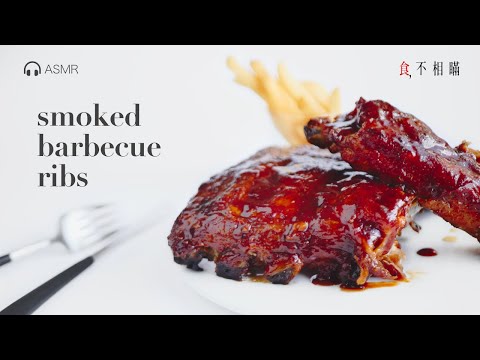
parchment 在 糖餃子Sweet Dumpling Youtube 的最佳貼文
2021-09-18 12:15:00Hello friends! Today we're going to share with you how to make juicy oven-baked smoked BBQ ribs at home.
Copying and practicing a recipe from a famous restaurant is the most challenging thing, but it is very interesting and we learn new things from it. In this video, we copied the taste of the famous pepper ribs, but made some modifications, because some ingredients are not found in this city. Chili’s slow-cooked pork ribs has been a top seller on the menu since 1986 and is still the best seller today. So this is a must try.
To make smoked flavor BBQ ribs without a smoker, we slow cook in the oven, and make the Chili's BBQ sauce with smokey chipotle in adobo, or it can be made by liquid smoke instead. The flavor is found in the sauce, and the cooking secret is slow-braising which can keep the meat juicy and tender like the original. You can use the barbecue sauce suggested in the recipe below or use your favorite homemade or store-bought sauce. Hope you like it. Enjoy. :)
📍 Please follow us on Instagram:: https://www.instagram.com/sweetdumplingofficial/
📍 Welcome to follow us on FB: https://www.facebook.com/sweet.dumpling.studio/
-----------------------------------------------------------------------
How to make Oven-Baked Smoked BBQ Ribs
✎ Ingredients
pork ribs 950g
☞ for dry marinades
coarse salt 70g
black pepper 15g
ground white pepper 4g
cayenne pepper 2g
granulated sugar 3.5g
garlic powder 1.5g
onion powder 1.5g
☞ for BBQ sauce
chipotle peppers in adobo 7g
regular soy sauce 32g
tomato paste 70g
ketchup 20g
chicken broth 30g
apple cider vinegar 35g
dark beer 45g
fresh orange juice 87g
minced garlic 10g
chili powder 1.5g
onion powder 5g
salt 3g
black pepper 2.5g
light brown sugar 130g
1. Combine together coarse salt, black pepper, ground white pepper, cayenne pepper, granulated sugar, garlic powder and onion powder, mix well.
2. Line a baking tray with foil or parchment paper.
3. Place the ribs on the baking tray, pat dry the ribs with paper towels on both sides.
4. Using a sharp knife to take off excess fat. Just keep a little fat.
5. Remove the silver skins or whitish dense skin on the bone side of the ribs.
6. Then turn the meatier side facing up, generously season with 1 tablespoon of dry marinades.
7. Cover with another foil, shiny side out.
8. Preheat the oven to 135C, bake for 2.5~3 hours.
9. While the ribs bake, make the barbecue sauce. Add all the sauce ingredients together, using an immersion blender to blend the ingredients until smooth. Pour into a saucepan and cook over medium-low heat for 15-20 minutes, stirring often until thicker.
10. Once baked, remove foil and transfer to a new baking tray and brush ribs with the barbecue sauce on both sides. Let the bone side facing up.
11. Preheat the oven to 220C, bake for 5 minutes, then turn the meatier side facing up and brush a little bit of sauce and bake for 10 minutes or until ribs have been caramelized.
12. Transfer the ribs to a plate or a cutting board, brush with sauce again if needed and serve.
-----------------------------------------------------------------------
Chapter:
00:00 intro
00:35 Ingredients
01:07 how to make season spice
02:33 prepare the ribs
03:56 slow cook ribs in oven
04:55 how to make smoked BBQ sauce
08:32 caramelized the ribs
11:11 enjoy
-----------------------------------------------------------------------
#BBQRibs
#copycatRecipes![post-title]()
-
parchment 在 cook kafemaru Youtube 的最讚貼文
2021-09-18 10:13:11梨をキャラメリゼして、バター生地に混ぜ込んだパウンドケーキ。
生地は、ふわふわしっとりで、ところどころからキャラメリゼした梨が顔を出します。
とにかく。めちゃめちゃ美味しい^^
「女子力高いと言わせる手作りスイーツ♡」
こんな目的で手作りスイーツを作ろうだなんて、素直すぎて応援したくなる!
誰かに褒められたいその一心で作ればきっとうまくできるはず^^
彼氏や家族やお世話になってる方にぜひ、焼いてプレゼントしてください。
女子力あげあげだーーー!!!
レシピは下にあります↓
フォロー&いいね! も お願いします!!!!!!
twitter
https://twitter.com/cookkafemaru
instagram
https://www.instagram.com/kafemaru/?hl=ja
Blogブログ始めました。
良かったら遊びにきてください^^
https://ameblo.jp/28280807
==================================================
大人気YouTuber “cook kafemaru”の
「罪深いスイーツ」
Amazonはこちらから購入できます↓↓↓
https://www.amazon.co.jp//dp/4046048948/
「世界一作りやすいおうちスイーツ 」
https://www.amazon.co.jp/dp/4046045116/
もしもお住いの近くの本屋さんになかったら、セブンイレブンの
オムニ7でネット予約し、セブンイレブン店頭受け取りで買うことができます!
=============================================
【Ingredients】7in(18cm)×3in(8cm)loaf pan
●Butter cake
120g Unsalted butter
100g Granulated sugar
100g Whole egg
120g Cake flour
1tsp Baking powder
●Caramelized pear
300g Japanese pear
15g Granulated sugar
10g Unsalted butter
【Directions】
●Make Caramelized pear
In a pan melt the butter, then add the sugar and pears.
Stir and cook for about 10-15 minutes over medium
The pears should be tender and the sauce a golden brown colour.
Remove it from the pan, let it cool.
●Make Butter cake
Preparation:
Bring the eggs and butter to room temperature.
Beat the egg well.
Line the pan with parchment paper.
①Cream the butter until smooth. Add granulated sugar and Mix well.
Mix it with a hand mixer until white and fluffy (for 3 mins)
②Add the egg to the batter in 4-5 parts.
You should warm the egg in hot water to 35℃ / 95 F if your room is cold.
Preheat the oven to 338 °F/170℃.
③Add the sifted flour and baking powder.
Fold it until powderiness disappears and gets glossy a little.
④Add caramelized pear and fold.
⑤Put the batter into the loaf and smooth the surface.
⑥Layer the caramelized pear slices, overlapping slightly, over the top.
⑦Bake at 338 °F/170℃ for about 50 minutes.
⑧Remove the cake from the pan while it's warm.
⑨Let it cool for around 30 mins.
Seal it with plastic wrap.
⑩Let it sit for 5-6 hours or more at room temperature. Done!
*Please bring the eggs to room temperature before using them If they are still cold, they will make the butter cold, and make the mixture separate easily.
***れしぴ置き場***
【材料】18cm×8cm×H6cm パウンド型 1台分
●バターケーキ
無塩バター 120g
グラニュー糖 100g
全卵 100g
薄力粉 120g
ベーキングパウダー 小さじ1
●梨のキャラメリゼ
和梨 300g (大き目1/2個)
グラニュー糖 15g
無塩バター 10g
【作り方】
●梨をキャラメリゼする
①梨は大き目のもの半分を用意し、皮を剥く。
半分は、生地の混ぜ込み用に小さ目に切る。
残り半分は飾り用にくし形に切る
②弱火でフライパンを熱し、バターを入れて溶けたらすぐに砂糖と梨を入れる。
***強火でやってしまうと、砂糖が固まってしまい溶けなくなるので
注意する。
③火を中火にして色づくまで加熱する。
④取り出して冷ましておく
●バターケーキを作る
準備:
卵とバターは必ず室温にする。
卵は溶いて、100g量る。
型にクッキングシートを敷いておく。
①バターをハンドミキサーでふわふわに立てる。
グラニュー糖を加えて白っぽくふわっとするまで立て続ける(3分程度)
ハンドミキサーではなく泡立て器使用の時は5-6分頑張って立てましょう。ここが大きなポイント!
②卵を4~5回に分けて生地に加える。
***室温に戻していない卵を加えると分離するので気を付ける。
卵出し忘れの時は、卵をよく溶いてから、ボウルなどに入れたままボウルの底をお湯につけながら、指などで卵の温度を確認しながら室温に戻します。
温めすぎると今度はバターに加えたときにバターが溶け出すので注意! 理想はバターと卵の温度が一緒位。
ここで、そろそろオーブンを170℃に予熱スタート。
③ふるいにかけた小麦粉とベーキングパウダーを3回に分けて加え
粉っぽさが消えて、少しつやが出るまで混ぜる。
④生地用の梨を加えてざっと混ぜる。
⑤生地を型に入れ、表面をならす。
⑥トッピング用の梨を重ねながら上に乗せる。
⑦170℃に温めたオーブンで約50分焼く。
***中央がぷっくりと膨れ上がり焼き色がつけばok
⑧温かいうちに型から取り出す。
⑨そのまま粗熱が取れるまで冷ます。
粗熱が取れたらラップまたはビニール袋に入れる。
⑩室温で5~6時間寝かせれば出来上がり!
●ポイント
卵を加える時の卵の温度に気を付けましょう。
卵が冷たすぎるとバターが冷えて固くなり、混ざらずに分離します。
そのあとに薄力粉を加えてしまえば見た目的には大丈夫には見えますが、
生地がきちんと乳化出来てないことになるので、焼いたときに
水分が蒸発しやすくて、目の詰まったざらざらの焼き上がりになります。
焼き上がりはあまり変化がわからないですが、食感はまったく別物になるかと思います。
美味しく焼くためには卵とバターの温度はとても大切です。
●焼き上がり後、保存は涼しい部屋で。
出来れば室温で翌日くらいまでに食べる。
もし食べきれなくて冷蔵庫保存したなら、バターがしまって固くなるので、必ず室温に戻して食べて下さい。
冷凍保存の時はひとつずつラップに包んでからジッパー付き袋で冷凍、食べる時は室温で自然解凍してください。![post-title]()


parchment 在 Rabbitfoot CO Facebook 的最佳解答
🤘 這是兔兔兔老闆,更多商品及商品資訊都在 Rabbitfootco.com ,也可以直接私訊,不用客氣,無法24小時在線,但一定都會盡快回覆。
我的IG,帳號: RBFT5422 IG傳送門➡️ https://www.instagram.com/RBFT5422/ #兔兔兔老闆 #RabbitFootCo #兔腳農場
-
🎗 Converse Chuck 70 Ox "Parchment" 162062C
-
🎗尺寸: 7-13
-
🎗售價: $2980 +宅配120/超商80 請私訊確認尺寸及更多資訊。
parchment 在 TEEPR 亮新聞 Facebook 的精選貼文
她好可愛~~(貞德編)
parchment 在 蘋果新聞網 Facebook 的精選貼文
真的是人美心地又好...
👆《蘋果》新聞多,24小時陪伴你
#蘋果體育 #東奧 #Tokyo2020 #Olympics2020 #日本 #正妹 #暖新聞 #河島緹亞娜