雖然這篇Kouglof鄉民發文沒有被收入到精華區:在Kouglof這個話題中,我們另外找到其它相關的精選爆讚文章
在 kouglof產品中有30篇Facebook貼文,粉絲數超過1萬的網紅Starry Starry Tearoom,也在其Facebook貼文中提到, ✨✨Basic Bread Lesson 2- Chocolate Marble✨✨ 第一節自選課堂,選了這個要入模的朱古力扭紋包。 我從前在學校學過的入模麵包,只有口感像蛋糕做法像麵包的kouglof。尤記得那個可怕的重型麵團,用廚師機打都見到它很吃力。還有那個複雜花紋的模具,Chef千叮萬囑...
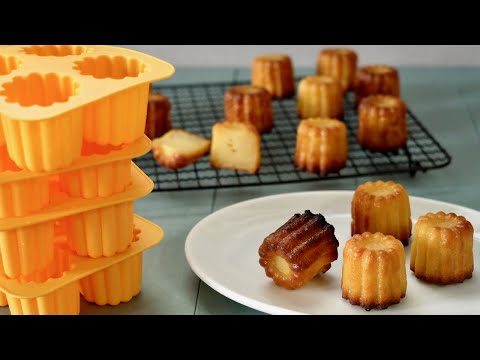
同時也有8部Youtube影片,追蹤數超過304萬的網紅MosoGourmet 妄想グルメ,也在其Youtube影片中提到,カヌレの型は、ずっと欲しかったけどけっこうお高い。いつもこの動画で使ったクグロフ型を使ってカヌレを作って楽しんでいました。( https://youtu.be/JqCU6YOvdCo ) そんな時に知った100円ショップの情報。たった100円でカヌレの型が買えるなんて!夢みたい!とセリアのシリコーン...
「kouglof」的推薦目錄
- 關於kouglof 在 Life Enjoyer ? Instagram 的最讚貼文
- 關於kouglof 在 ELLIE FURUYA Instagram 的精選貼文
- 關於kouglof 在 Amanda Strang Instagram 的最佳解答
- 關於kouglof 在 Starry Starry Tearoom Facebook 的最讚貼文
- 關於kouglof 在 法國生活日記 Facebook 的最讚貼文
- 關於kouglof 在 HanaKitchen Facebook 的最佳解答
- 關於kouglof 在 MosoGourmet 妄想グルメ Youtube 的最佳解答
- 關於kouglof 在 Peaceful Cuisine Youtube 的精選貼文
- 關於kouglof 在 Peaceful Cuisine Youtube 的精選貼文
kouglof 在 Life Enjoyer ? Instagram 的最讚貼文
2021-09-03 04:51:38
Check out the new ‘ 1664 Taste of Bleu’ Pop up store at the Atrium of K11 Art Mall (23 July - 9 Aug, 11am - 10pm) 🍻🍻🍺The French bulldog set up was so...
kouglof 在 ELLIE FURUYA Instagram 的精選貼文
2021-08-16 17:11:38
Beer and dainty French sweets? Yes please! Paired my 1664 Blanc with foie gras macaron and almond kouglof designed by pastry queen @amandastrang_ 👑👩🍳...
kouglof 在 Amanda Strang Instagram 的最佳解答
2021-08-16 19:25:19
“L’été est ma destination préférée” (Summer is my favourite destination) So come to the 1664 pop up “Taste of Bleu” for a unique French experience at...
-
kouglof 在 MosoGourmet 妄想グルメ Youtube 的最佳解答
2021-08-21 10:00:13カヌレの型は、ずっと欲しかったけどけっこうお高い。いつもこの動画で使ったクグロフ型を使ってカヌレを作って楽しんでいました。( https://youtu.be/JqCU6YOvdCo )
そんな時に知った100円ショップの情報。たった100円でカヌレの型が買えるなんて!夢みたい!とセリアのシリコーンモールド カヌレ型をずっと探していました。そして、この度、やっとやっと入手することができました!
ずいぶん長いこと探していたセリアのシリコーンモールド カヌレ型だったので、迷いなく4個を即買い。
しかしここで問題が発生。家に帰ってパッケージの裏を見てみたら、そこには衝撃の事実が!
なんと『耐熱温度以下であっても20分以内で使用してください』との説明書き。カヌレって1時間連続加熱がほぼ常識。これどうすりゃいいのよ!と考えて、苦肉の方法で焼成しています。焼き、腰折れ、色々と改善の余地ありなのですが、材料は16個分ぴったりの卵液量で、しかも卵黄1個で作れるように調整しました。焼き菓子と蝉の声のアンバランスもお楽しみください。
*レシピ*(3.5 ✕ H3.5センチのミニカヌレ16個/400ml分)
薄力粉:70g
Mサイズの卵の卵黄:1個分
グラニュー糖:115g
牛乳:250g
ラム酒:10g
バニラオイル:3振り
無塩バター(型に塗る用):適量
1.薄力粉 70gをフルっておく。
2.ボウルに卵黄 1個分(Mサイズの卵の卵黄 20g)を溶く。
3.グラニュー糖 115gを入れ混ぜる。
4.60℃に温めた牛乳 250gを(3)に少し加え混ぜる。
5.(1)を加え混ぜる。混ぜすぎないこと。
6.(4)の残りの牛乳を加え混ぜる。
7.ラム酒 10gとバニラオイル 3振り加え混ぜる。
8.アミで濾す。
9.冷蔵庫で12〜24時間休ませる。
10.卵液を冷蔵庫から出し、1時間ほどおき、常温にしておく。
11.カヌレ型に無塩バターをちょっと多めに塗り、冷蔵庫に入れておく。
12.オーブンは220℃にしっかり予熱しておく。
13.(10)の常温にした卵液を静かに底から混ぜる。
14.(11)の型に流し入れる。
15.220℃に予熱したオーブンで20分焼く。
16.一旦取り出し3分待つ。
17.再び、220℃に予熱しておいたオーブンに入れ、170℃に変更し20分焼く。
18.再び、一旦取り出し3分待つ。
19.再び、170℃に予熱したオーブンで20分焼く。
20.オーブンから取り出し、型のまま10分おく。
21.網に取り出す。
22.でけた。
オーブン温度を
220℃を230℃に 170℃を180℃に上げ、もっとカリカリに焼けるように再挑戦したいです。
改善の余地ありだけど、家族がおいしいと言ってくれたからよし。しかし、このカヌレ型かわいい。ゼリーやチョコレートにも使いたいわ。
#Seria #カヌレ型 #カヌレ #作り方
I've always wanted a canelé mold, but they are quite expensive. I always enjoyed making cannulae using the kouglof mold used in this video. ( https://youtu.be/JqCU6YOvdCo )
That's when I learned about a 100 yen shop information. How can you buy a canelé mold for only 100 yen? It's like a dream! I've been looking for the Seria Silicone Canele molds for a long time. And now I've finally, finally got one!
I've been looking for these molds for a long time, so I bought 4 of them right away without hesitation.
But here's the problem. When I got home and looked at the back of the package, I found a shocking fact! It said, "Please use within 20 minutes even if the temperature is below the heat resistant temperature." It's almost common knowledge that canelés should be heated continuously for an hour. I thought to myself, "What am I supposed to do?"
Thinking that, somehow I managed to bake it.
There is a lot of room for improvement in the baking process, but I have adjusted the ingredients so that I can make 16 canelés with exactly the right amount of egg liquid, and only one egg yolk.
Please enjoy the imbalance between the baked goods and the cicadas' voices.
* Recipe * (3.5 ✕ H3.5 cm mini canelés 16 pieces / 400 ml)
Cake flour: 70g
Egg yolk of M size egg: 1
Granulated sugar: 115g
Milk: 250g
Rum: 10g
Vanilla oil: 3 shakes
Unsalted butter (for applying to mold): Appropriate amount
1.Sift 70g of cake flour.
2.In a bowl, beat the yolk of one egg (20g of yolk from a medium egg).
3.Mix in 115g of granulated sugar.
4.Add a little from 250g of warmed milk (60℃) to (3) and mix.
5.Add (1) and mix. Do not mix too much.
6.Add the remaining milk from (4) and mix.
7.Add 10g of rum and 3 shakes of vanilla oil.
8.Strain through a mesh.
9.Let it rest in the refrigerator for 12 to 24 hours.
10.Remove the egg mixture from the refrigerator and allow it to come to room temperature for about an hour.
11.Grease a canelé mold with a little more unsalted butter and put it in the refrigerator.
12.Preheat the oven to 220℃.
13.Gently mix the egg liquid at room temperature in (10) from the bottom.
14.Pour the mixture into the mold of (11).
15.Bake in a preheated oven at 220℃ for 20 minutes.
16.Take it out and wait 3 minutes.
17.Place in the preheated oven again at 220℃, change the temperature to 170℃, and bake for 20 minutes.
18.Take it out again and wait for 3 minutes.
19.Bake again in a preheated oven at 170℃ for 20 minutes.
20.Remove from the oven and leave the mold for 10 minutes.
21.Take it out to the net.
22.It's done.
I'd like to try again to raise the oven temperature from 220°C to 230°C and from 170°C to 180°C, so that it bakes more crispy. There's room for improvement, but my family said it was delicious, so that's good. By the way, these cannelé molds are cute. I want to use them for jelly and chocolate.![post-title]()
-
kouglof 在 Peaceful Cuisine Youtube 的精選貼文
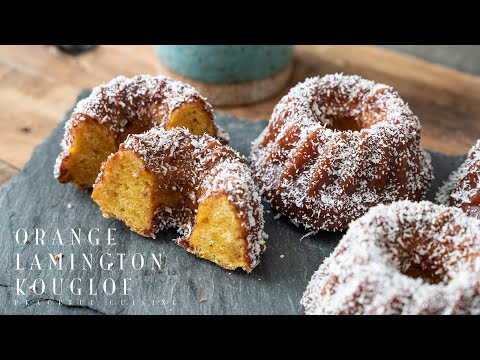
2020-09-14 05:49:53I lived in Sydney, Australia for a whole year when I was 20 year old. That's where I started my cooking journey! I loved drinking coffee at Bondi beach, yes I worked as a chef assistant at a cafe in Bondi. I actually never tried lamington when I was there. I ate a lot of TimTam though. lol Anyways, Australian Orange is in season in Australia right now, go get your orange and make this Australian style treat! G'day mate ;)
Taste Australia
https://www.instagram.com/tasteaustralia_jp/
https://www.facebook.com/TasteAustraliaJapan/
Same video without music : https://youtu.be/lx9fHzJe9wY
-----------------------------------------------------------------------
Music : (Epidemic Sound)
get 30 day free trial using the link below :)
http://share.epidemicsound.com/FQbHC
#1 // Castor - S.A. Karl
#2 // Forget - Jakob Ahlbom
-----------------------------------------------------------------------
Ingredients: makes 6 mini kouglofs
For the kouglof :
100 pastry flour
130g orange
25g oat milk (or whatever you like)
30g oil
60g beet sugar
1 tsp baking powder
For the frosting :
100g icing sugar
7g cacao powder
1 tsp coconut oil
1 1/2 tbsp home made vanilla extract (or water)
coconut flakes
Instructions:
1. In a blender, combine orange, oil and oat milk together and blend well.
2. add pastry flour, sugar and baking powder and mix well.
3. pour the mixture into a kouglof pan. bake at 180C/356F for 30 minutes.
4. mix all the ingredients for the frosting and pour over kouglof. sprinkle coconut flakes.
5. set aside and wait until it completely dries (it takes about a few hours to a day)
6. Enjoy!
-----------------------------------------------------------------------
「材料」ミニクグロフ6個分
薄力粉 100g
オレンジ 130g
オーツミルク 25g
オイル 30g
てん菜糖 60g
ベーキングパウダー 小さじ1
「作り方」
1、オレンジ、オイル、オーツミルクをブレンダーで滑らかになるまで混ぜる。
2、薄力粉とベーキングパウダーを篩い入れ、混ぜ合わせる。
3、クグロフ型に流し込み、180℃で30分、オーブンで焼く。
4、フロスティングの材料を全て混ぜ合わせる。必要に応じて水で固さを調節する。クグロフ全体に垂らす。
5、完全に乾くまで待ちます。(数時間〜1日ほど)
6、エンジョーイ!
-----------------------------------------------------------------------
Website : http://www.peacefulcuisine.com
Instagram:@peaceful_cuisine
Facebook : https://www.facebook.com/peacefulcuisine.ryoya
Other Channel : https://www.youtube.com/c/RyoyaTakashima
App : https://play.google.com/store/apps/details?id=jp.co.c2inc.peacefulcuisine
-----------------------------------------------------------------------
Equipments & etc:
Camera : Fujifilm GFX100
Lens : Fujinon GF45mmF2.8
Lens Filter : Kenko variable NDX 82mm / Kenko MC close-up filter NEO No.1 & No.3
Mic:SENNHEISER MKE600
Monitor : Atomos Shinobi
Tripods:SLIK carbon 923 pro/ SLIK carbon 823 pro/ SLIK mini pro 7/ RRS TP-243 Ground-Level Tripod
Slider : iFootage Shark Slider Mini
Edit : Adobe Premiere Pro
-----------------------------------------------------------------------![post-title]()
-
kouglof 在 Peaceful Cuisine Youtube 的精選貼文
2020-09-14 05:49:38I lived in Sydney, Australia for a whole year when I was 20 year old. That's where I started my cooking journey! I loved drinking coffee at Bondi beach, yes I worked as a chef assistant at a cafe in Bondi. I actually never tried lamington when I was there. I ate a lot of TimTam though. lol Anyways, Australian Orange is in season in Australia right now, go get your orange and make this Australian style treat! G'day mate ;)
Taste Australia
https://www.instagram.com/tasteaustralia_jp/
https://www.facebook.com/TasteAustraliaJapan/
Original video with music : https://youtu.be/txNdohqUmgw
-----------------------------------------------------------------------
Ingredients: makes 6 mini kouglofs
For the kouglof :
100 pastry flour
130g orange
25g oat milk (or whatever you like)
30g oil
60g beet sugar
1 tsp baking powder
For the frosting :
100g icing sugar
7g cacao powder
1 tsp coconut oil
1 1/2 tbsp home made vanilla extract (or water)
coconut flakes
Instructions:
1. In a blender, combine orange, oil and oat milk together and blend well.
2. add pastry flour, sugar and baking powder and mix well.
3. pour the mixture into a kouglof pan. bake at 180C/356F for 30 minutes.
4. mix all the ingredients for the frosting and pour over kouglof. sprinkle coconut flakes.
5. set aside and wait until it completely dries (it takes about a few hours to a day)
6. Enjoy!
-----------------------------------------------------------------------
「材料」ミニクグロフ6個分
薄力粉 100g
オレンジ 130g
オーツミルク 25g
オイル 30g
てん菜糖 60g
ベーキングパウダー 小さじ1
「作り方」
1、オレンジ、オイル、オーツミルクをブレンダーで滑らかになるまで混ぜる。
2、薄力粉とベーキングパウダーを篩い入れ、混ぜ合わせる。
3、クグロフ型に流し込み、180℃で30分、オーブンで焼く。
4、フロスティングの材料を全て混ぜ合わせる。必要に応じて水で固さを調節する。クグロフ全体に垂らす。
5、完全に乾くまで待ちます。(数時間〜1日ほど)
6、エンジョーイ!
-----------------------------------------------------------------------
Website : http://www.peacefulcuisine.com
Instagram:@peaceful_cuisine
Facebook : https://www.facebook.com/peacefulcuisine.ryoya
Other Channel : https://www.youtube.com/c/RyoyaTakashima
App : https://play.google.com/store/apps/details?id=jp.co.c2inc.peacefulcuisine
-----------------------------------------------------------------------
Equipments & etc:
Camera : Fujifilm GFX100
Lens : Fujinon GF45mmF2.8
Lens Filter : Kenko variable NDX 82mm / Kenko MC close-up filter NEO No.1 & No.3
Mic:SENNHEISER MKE600
Monitor : Atomos Shinobi
Tripods:SLIK carbon 923 pro/ SLIK carbon 823 pro/ SLIK mini pro 7/ RRS TP-243 Ground-Level Tripod
Slider : iFootage Shark Slider Mini
Edit : Adobe Premiere Pro
-----------------------------------------------------------------------![post-title]()


kouglof 在 Starry Starry Tearoom Facebook 的最讚貼文
✨✨Basic Bread Lesson 2- Chocolate Marble✨✨
第一節自選課堂,選了這個要入模的朱古力扭紋包。
我從前在學校學過的入模麵包,只有口感像蛋糕做法像麵包的kouglof。尤記得那個可怕的重型麵團,用廚師機打都見到它很吃力。還有那個複雜花紋的模具,Chef千叮萬囑要仔細塗油,每一條坑都不能遺漏,否則黏模就一定會前功盡廢。後來我們幾個同學take our time邊塗油邊快樂聊天,結果被Chef狠狠地罵了一場。
俱往矣。此刻想起這些,真有無盡的懷念。
這天只剩下我一個,望著一大堆材料發呆。這兒的老師當然比chef客氣多了,知道我是新手,耐心地向我解說如何閱讀這兒的食譜。仔細混合好材料後,又是手搓麵團的環節。 老師說想麵包做出來能夠頂角,有兩個步驟要比較注意,一是麵團要搓揉得夠充足,要好好地起筋;第二是發酵時要多點耐性,充分頂模才好烤焗。所以想要這款麵包做得好,此刻要努力搓麵團了。
明明這兒的麵團份量比起從前少了幾倍不止,但我近來很無力,左手竟然常常按不穩麵團,讓它滾來滾去,後來鼓起餘勇才能稍稍穩定下來。每一次按不穩時都嚇得抬頭望望周圍,然後又忍不住失笑。我那被罵的陰影真是如影隨形,這兒是沒人會罵學生的。不過沒人罵,卻結果進度大落後,最後我搓了足足三十分鐘,才能夠放進prover。
之後的步驟就輕鬆多了,只是模具塗油而已。然後不停等發酵,比較麻煩的是造型。今次要擀平2塊長方型麵團來疊在一起來卷,所以尺寸要掌握得比較好。我發現這個環節對其他同學來說原來是頗困難,每次對面的陌生同學見到我能飛快地擀出工整又符合尺寸的長方型,總是嘖嘖稱奇。
要擀得工整漂亮,其實是考驗自己對操控rolling pin的力度和方向。為了做好酥皮和croissant,當年chef可是親自捉手教了我好多次。不過如此仔細的技巧,在這些短短的課堂,實在很難教懂學生吧。
因為我在課堂之初,特地請教老師如何頂角的技巧,所以老師在最後發酵後,再次打開模具教我如何去觀察麵團。之後烤焗出來,果然做出一條超完美的圓柱體。小快樂💕
我的家中收集了很多可愛的麵包模具,之前都不太懂得使用,現在終於可以派上用場了。
#starry麵包學習旅程
kouglof 在 法國生活日記 Facebook 的最讚貼文
今日農村麵包出爐:阿爾薩斯咕咕洛夫(Kouglof)奶油圓蛋糕小試上手。
最近兩個月做麵包做出興趣來,連日記都懶得打了,感覺就像捏陶土、雕塑ㄧ樣 ,每次揉麵粉都想嚐試一下新的種類作法、期待出爐的樣子,像這法國東北阿爾薩斯特產,外型如皇冠般的傳統麵包咕咕洛夫通常都是聖誕節在吃的,外邊還可灑上如雪花般的糖霜,歐洲中部、東部如南德、捷克、奧地利也很風行。
這次連做了兩個,ㄧ大一小,小的用的是法西布列塔尼的盤子,麵粉不對沒發起來,大的用的則是真正的阿爾薩斯盤,不過嫌早出爐了些,想成為Top Chef還差得很遠,但外型還是美吧?! 😋
Homemade Kouglof for the first time(Kougelhopf)
kouglof 在 HanaKitchen Facebook 的最佳解答
全部都係brioche, 只不過換咗件衫啫。你喜歡邊個造型?迷你Kouglof定☃️雪人?🤪
www.instagram.com/hanapassion