雖然這篇silicone耐熱鄉民發文沒有被收入到精華區:在silicone耐熱這個話題中,我們另外找到其它相關的精選爆讚文章
在 silicone耐熱產品中有2篇Facebook貼文,粉絲數超過7萬的網紅Patc 遊走泡菜國,也在其Facebook貼文中提到, 今日除了5pm在這裡有韓國直播連線shopping之外! 都係 PSELECT 今團last day! 今團比較受歡迎的一樣有ROSA.K 泫雅袋和100% Silicone耐熱防菌矽膠廚具系列🥰 今天內在網站下單可以跟埋4月7-9日到香港那團🙌🏻 詳細資料可參考 韓國生活百貨 P Select...
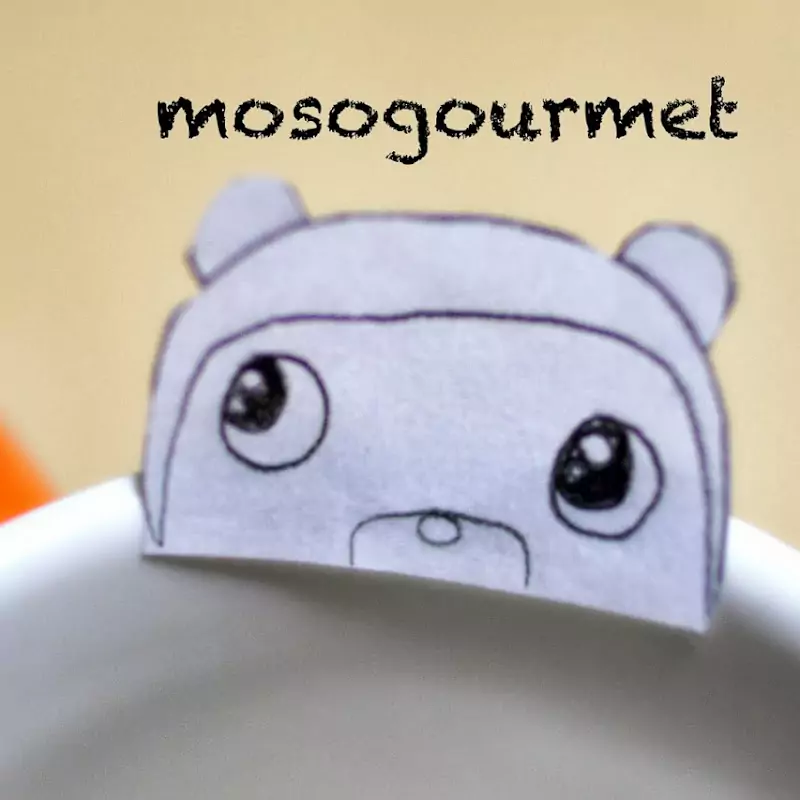
同時也有139部Youtube影片,追蹤數超過304萬的網紅MosoGourmet 妄想グルメ,也在其Youtube影片中提到,@リンネル チャンネル リンネル 11月号増刊 特別付録のオサムグッズのシリコーンケーキ型を使ってスノースキン月餅を作ってみました。見た目はスノースキン感は弱いですが、月餅🥮の型がなくても、シリコン型で作れたのがポイント。伸びのよい柔らかな餅皮とホワイトチョコのミルキー感がとっても合います。包みやす...
「silicone耐熱」的推薦目錄
- 關於silicone耐熱 在 蔡欣伈✩ 我4尼ㄉ小欣伈呢 ☻ Instagram 的精選貼文
- 關於silicone耐熱 在 Sylvia汪詩敏 Instagram 的最佳解答
- 關於silicone耐熱 在 駱駝熊禮品屋 日本、香港迪士尼代購 Instagram 的最佳解答
- 關於silicone耐熱 在 Patc 遊走泡菜國 Facebook 的最佳解答
- 關於silicone耐熱 在 BRUNO BLACK / I am the Brand Facebook 的精選貼文
- 關於silicone耐熱 在 MosoGourmet 妄想グルメ Youtube 的最讚貼文
- 關於silicone耐熱 在 MosoGourmet 妄想グルメ Youtube 的精選貼文
- 關於silicone耐熱 在 cook kafemaru Youtube 的精選貼文
silicone耐熱 在 蔡欣伈✩ 我4尼ㄉ小欣伈呢 ☻ Instagram 的精選貼文
2021-09-24 09:59:37
好物推薦時刻又來啦~~~~~~ 阿啾現在吃飯都咩甲那恩甲, 真的讓我很頭痛餒 沒辦法在菜色跟食慾上做改變的話 就在擺盤上做改變吧 🤣🤣🤣 這次入手的是「innobaby歡樂小雞矽膠餐盤、innobaby歡樂小雞矽膠蒸盤」 #innobaby矽膠餐盤呢~ 100%矽膠,而且耐熱溫度是-40度~+2...
silicone耐熱 在 Sylvia汪詩敏 Instagram 的最佳解答
2020-12-14 14:56:23
終於有冬天的感覺,可愛又暖心的牛奶保溫瓶陪我每天教課和運動的日常!這個組合太美ㄧ定要搶在聖誕節前開團ㄧ波,讓妳們交換禮物開箱時大方實用又不失面子🎁 快速下單這邊👇🏻(首頁連結) https://shimin.cashier.ecpay.com.tw 想了解更多這邊👇🏻 除了外表美麗,保溫瓶材質也是...
silicone耐熱 在 駱駝熊禮品屋 日本、香港迪士尼代購 Instagram 的最佳解答
2020-08-12 08:54:20
💁2020年英國貝手提爾熊最新款彈跳水瓶來嘍! 🔥英國貝爾熊 手提健康瓶730ml 💰預購價~229 ✨顏色選擇👉粉/綠 ⭐️英國貝爾正版授權⭐️ 730ml瘦高型的,除了攜帶方便👍 這容量夏天真的很需要☝️ 超級可愛的熊熊瓶子 粉色,綠色都好好看❤️ 🌞這個夏天一定要🈶️ 這一支多貼心設...
-
silicone耐熱 在 MosoGourmet 妄想グルメ Youtube 的最讚貼文
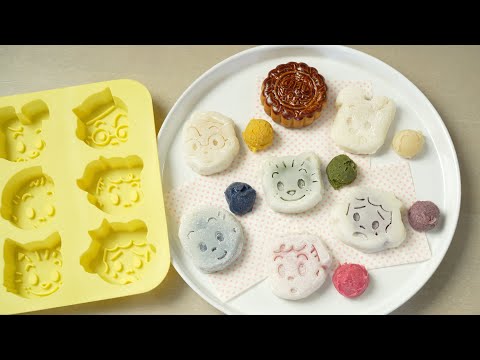
2021-09-25 18:18:38@リンネル チャンネル リンネル 11月号増刊 特別付録のオサムグッズのシリコーンケーキ型を使ってスノースキン月餅を作ってみました。見た目はスノースキン感は弱いですが、月餅🥮の型がなくても、シリコン型で作れたのがポイント。伸びのよい柔らかな餅皮とホワイトチョコのミルキー感がとっても合います。包みやすい餅皮なので同量の餡でも包みやすいです。型離れのポイントは打ち粉。片栗粉を型や餅皮の側面に多めに振ってください。くっつかずに作業できます。型に餅が貼り付き、1回、失敗してしまいました。
昔から大好きだったオサムグッズ。付録でシリコン型が手に入るなんていい時代なんだ。
*レシピ*(およそ64mlの型 6個分)
ホワイトチョコ餡を作ります
1.ホワイトチョコ 42gを溶かす。
2.白あん 150gを入れ混ぜる。
3.6等分にする。
4.お好みにパウダーで着色する。
今回、かぼちゃパウダー・紫芋パウダー・いちごパウダー 各2g、バタフライピーパウダー・抹茶 各1gで着色しています。もちろんそのままでもOKです。
5.ラップで丸く包み、冷蔵庫または冷凍庫で冷やしておく。
餅皮を作ります。
6.耐熱ボウルに白玉粉 24g、水 96gを入れ粒がなくなるまで混ぜる。
7.加糖練乳 24g、サラダオイル 24gと上新粉 24g、薄力粉 8g、上白糖 24gをあわせてフルイ入れ、泡立て器で混ぜる。
8.ふんわりラップをして、600wの電子レンジで50秒加熱し泡立て器で混ぜる。
9.その後、20秒加熱を3回繰り返し、その都度、泡立て器で混ぜる。
10.更に20秒加熱を3回繰り返し、その都度、今度はゴムベラで混ぜる。
11.更に今度はラップをしないで、1分30秒加熱し混ぜないでそのまま粗熱を取る。
12.片栗粉を広げたバットなどに(11)を6等分する。
13.ラップの間に(12)を伸ばす。
14.(5)を包む。
15.シリコン型に押し込む。
16.冷蔵庫で冷やす。
17.型から取り出す。
18.でけた。かわいいうまい。オサムグッズかわいい。永遠だな。
I made snow skin mooncakes using the silicone cake mold of OSAMU GOODS. It doesn't look like snow skin, but the key is that it can be made with a silicone mold even if you don't have a mooncake 🥮 mold.The milky texture of the white chocolate goes well with the soft and stretchy rice cake skin. Since it is a rice cake skin that is easy to wrap, it is easy to wrap even the same amount of bean paste. The key to mold release is flour. Sprinkle more potato starch on the sides of the mold and the rice cake skin. You can work without sticking. Mochi stuck to the mold and I failed once. I've always loved OSAMU GOODS. It's a good time to get a OSAMU GOODS silicone mold in a magazine freebie.
* Recipe * (for 6 molds of about 64 ml)
Make white chocolate bean paste.
1.Melt 42g of white chocolate.
2.Mix in 150g of white bean paste.
3.Divide into 6 equal parts.
4.Color with powder as desired. This time, I used 2g each of pumpkin powder, purple sweet potato powder, and strawberry powder, and 1g each of butterfly pea powder and matcha. Of course, you can leave them as they are.
5.Wrap in plastic wrap and chill in the refrigerator or freezer.
Make mochi skin.
6.Put 24g of Shiratamako and 96g of water in a heat-resistant bowl and mix until there are no grains.
7.Add 24g of sweetened condensed milk, 24g of salad oil, 24g of Joshinko, 8g of cake flour, and 24g of white sugar, and mix with a whisk.
8.Wrap it gently, heat it in a 600w microwave oven for 50 seconds, and mix it with a whisk.
9.Repeat heating for 20 seconds 3 times, mixing with a whisk each time.
10.Repeat heating for another 20 seconds three times, each time mixing with a rubber spatula.
11.Furthermore, without wrapping this time, heat for 1 minute and 30 seconds and remove the heat as it is without mixing.
12.Divide (11) into 6 equal parts on a tray with potato starch spread.
13.Spread (12) between sheets of plastic wrap.
14.Wrap (5).
15.Press into the silicon mold.
16.Chill in the refrigerator.
17.Remove from the mold.
18.It's done. Cute and delicious. OSAMU GOODS are eternal.
#SnowSkinMooncakes #recipe #月餅 #作り方 #オサムグッズ #リンネル #雑誌付録![post-title]()
-
silicone耐熱 在 MosoGourmet 妄想グルメ Youtube 的精選貼文
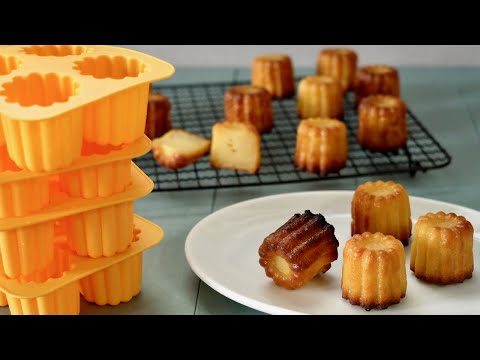
2021-08-21 18:00:13カヌレの型は、ずっと欲しかったけどけっこうお高い。いつもこの動画で使ったクグロフ型を使ってカヌレを作って楽しんでいました。( https://youtu.be/JqCU6YOvdCo )
そんな時に知った100円ショップの情報。たった100円でカヌレの型が買えるなんて!夢みたい!とセリアのシリコーンモールド カヌレ型をずっと探していました。そして、この度、やっとやっと入手することができました!
ずいぶん長いこと探していたセリアのシリコーンモールド カヌレ型だったので、迷いなく4個を即買い。
しかしここで問題が発生。家に帰ってパッケージの裏を見てみたら、そこには衝撃の事実が!
なんと『耐熱温度以下であっても20分以内で使用してください』との説明書き。カヌレって1時間連続加熱がほぼ常識。これどうすりゃいいのよ!と考えて、苦肉の方法で焼成しています。焼き、腰折れ、色々と改善の余地ありなのですが、材料は16個分ぴったりの卵液量で、しかも卵黄1個で作れるように調整しました。焼き菓子と蝉の声のアンバランスもお楽しみください。
*レシピ*(3.5 ✕ H3.5センチのミニカヌレ16個/400ml分)
薄力粉:70g
Mサイズの卵の卵黄:1個分
グラニュー糖:115g
牛乳:250g
ラム酒:10g
バニラオイル:3振り
無塩バター(型に塗る用):適量
1.薄力粉 70gをフルっておく。
2.ボウルに卵黄 1個分(Mサイズの卵の卵黄 20g)を溶く。
3.グラニュー糖 115gを入れ混ぜる。
4.60℃に温めた牛乳 250gを(3)に少し加え混ぜる。
5.(1)を加え混ぜる。混ぜすぎないこと。
6.(4)の残りの牛乳を加え混ぜる。
7.ラム酒 10gとバニラオイル 3振り加え混ぜる。
8.アミで濾す。
9.冷蔵庫で12〜24時間休ませる。
10.卵液を冷蔵庫から出し、1時間ほどおき、常温にしておく。
11.カヌレ型に無塩バターをちょっと多めに塗り、冷蔵庫に入れておく。
12.オーブンは220℃にしっかり予熱しておく。
13.(10)の常温にした卵液を静かに底から混ぜる。
14.(11)の型に流し入れる。
15.220℃に予熱したオーブンで20分焼く。
16.一旦取り出し3分待つ。
17.再び、220℃に予熱しておいたオーブンに入れ、170℃に変更し20分焼く。
18.再び、一旦取り出し3分待つ。
19.再び、170℃に予熱したオーブンで20分焼く。
20.オーブンから取り出し、型のまま10分おく。
21.網に取り出す。
22.でけた。
オーブン温度を
220℃を230℃に 170℃を180℃に上げ、もっとカリカリに焼けるように再挑戦したいです。
改善の余地ありだけど、家族がおいしいと言ってくれたからよし。しかし、このカヌレ型かわいい。ゼリーやチョコレートにも使いたいわ。
#Seria #カヌレ型 #カヌレ #作り方
I've always wanted a canelé mold, but they are quite expensive. I always enjoyed making cannulae using the kouglof mold used in this video. ( https://youtu.be/JqCU6YOvdCo )
That's when I learned about a 100 yen shop information. How can you buy a canelé mold for only 100 yen? It's like a dream! I've been looking for the Seria Silicone Canele molds for a long time. And now I've finally, finally got one!
I've been looking for these molds for a long time, so I bought 4 of them right away without hesitation.
But here's the problem. When I got home and looked at the back of the package, I found a shocking fact! It said, "Please use within 20 minutes even if the temperature is below the heat resistant temperature." It's almost common knowledge that canelés should be heated continuously for an hour. I thought to myself, "What am I supposed to do?"
Thinking that, somehow I managed to bake it.
There is a lot of room for improvement in the baking process, but I have adjusted the ingredients so that I can make 16 canelés with exactly the right amount of egg liquid, and only one egg yolk.
Please enjoy the imbalance between the baked goods and the cicadas' voices.
* Recipe * (3.5 ✕ H3.5 cm mini canelés 16 pieces / 400 ml)
Cake flour: 70g
Egg yolk of M size egg: 1
Granulated sugar: 115g
Milk: 250g
Rum: 10g
Vanilla oil: 3 shakes
Unsalted butter (for applying to mold): Appropriate amount
1.Sift 70g of cake flour.
2.In a bowl, beat the yolk of one egg (20g of yolk from a medium egg).
3.Mix in 115g of granulated sugar.
4.Add a little from 250g of warmed milk (60℃) to (3) and mix.
5.Add (1) and mix. Do not mix too much.
6.Add the remaining milk from (4) and mix.
7.Add 10g of rum and 3 shakes of vanilla oil.
8.Strain through a mesh.
9.Let it rest in the refrigerator for 12 to 24 hours.
10.Remove the egg mixture from the refrigerator and allow it to come to room temperature for about an hour.
11.Grease a canelé mold with a little more unsalted butter and put it in the refrigerator.
12.Preheat the oven to 220℃.
13.Gently mix the egg liquid at room temperature in (10) from the bottom.
14.Pour the mixture into the mold of (11).
15.Bake in a preheated oven at 220℃ for 20 minutes.
16.Take it out and wait 3 minutes.
17.Place in the preheated oven again at 220℃, change the temperature to 170℃, and bake for 20 minutes.
18.Take it out again and wait for 3 minutes.
19.Bake again in a preheated oven at 170℃ for 20 minutes.
20.Remove from the oven and leave the mold for 10 minutes.
21.Take it out to the net.
22.It's done.
I'd like to try again to raise the oven temperature from 220°C to 230°C and from 170°C to 180°C, so that it bakes more crispy. There's room for improvement, but my family said it was delicious, so that's good. By the way, these cannelé molds are cute. I want to use them for jelly and chocolate.![post-title]()
-
silicone耐熱 在 cook kafemaru Youtube 的精選貼文
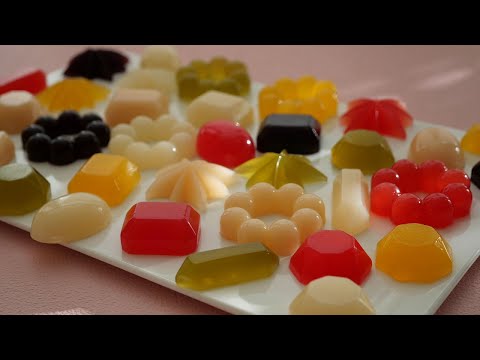
2021-08-05 20:51:02固めのグミが食べたくなったので、色んな味でいっぱい作っちゃいました。
意外にも一番美味しかったのは、カルピス味!
最初薄めて作ったらいまいちだったので、原液でで作りなおしたらちょうどよい♪
色が綺麗なのはやっぱりスイカ!
味はどれも濃い目にした方がグミ風になります。
冷蔵庫できっちり冷やしてどうぞ♡
レシピは下にあります↓
==================================================
大人気YouTuber “cook kafemaru”の
「罪深いスイーツ」
おかげ様で2刷になりました。
Amazonはこちらから購入できます↓↓↓
https://www.amazon.co.jp//dp/4046048948/
==================================================
「世界一作りやすいおうちスイーツ 」
もおかげ様で10刷になりました。
どうもありがとうございます。
Amazonで購入できます。↓↓↓
https://www.amazon.co.jp/dp/4046045116/
もしもお住いの近くの本屋さんになかったら、セブンイレブンの
オムニ7でネット予約し、セブンイレブン店頭受け取りで買うことができます!
=============================================
【Ingredients】
5 tbsp Juice of your choice
10g (1 tbsp) Gelatin powder g
1 tbsp Sugar
Watermelon juice
Green Tea
Melon milk
Calpico
Orange juice
Blueberry juice
【Directions】
①Put the juice in a heat resistant bowl and microwave at 600W for 40-50 seconds.
②Add sugar and gelatin powder and mix well.
③Pour it into a silicone mold.
④Cool in the fridge for about 30 minutes until completely set.
They can easily get soft at the room temperature, so please keep them in the fridge.
【材料】
好きなジュースや果汁 大さじ5
ゼラチンパウダー 10g
砂糖 大さじ 1
スイカ果汁
緑茶
メロンオ・レ
カルピス
オレンジジュース
ブルーベリージュース
【作り方】
①耐熱容器にジュースを入れて600w電子レンジで40-50秒温める。
(ゼラチンの使用方法に従ってください~)
②①に砂糖とゼラチンを加えてよく混ぜる。
③シリコン型に流し入れる。
④固まるまで冷蔵庫で30分ほど冷やす。
***室温の高いところでは溶けますので、冷蔵庫に入れてください。
***あればレモン汁も加えたほうがより美味しい。
***ゼラチン臭さが気になる人は、ゼラチンは湯せんで溶かしてください。![post-title]()

silicone耐熱 在 Patc 遊走泡菜國 Facebook 的最佳解答
今日除了5pm在這裡有韓國直播連線shopping之外!
都係 PSELECT 今團last day!
今團比較受歡迎的一樣有ROSA.K 泫雅袋和100% Silicone耐熱防菌矽膠廚具系列🥰
今天內在網站下單可以跟埋4月7-9日到香港那團🙌🏻
詳細資料可參考 韓國生活百貨 P Select Seoul
一陣連線shopping準備了現金券抽獎,港澳免運費優惠,直播限定折扣,一陣5pm見👋🏻👋🏻🇰🇷
🌈網站自助下單方便快捷:https://www.pselectseoul.com/
—
居韓7年,持韓國商業登記,希望在這裡幫大家找到好用合心水的韓國好物! 🙌🏻
每星期定期韓國直送香港 🇰🇷🛫🇭🇰
silicone耐熱 在 BRUNO BLACK / I am the Brand Facebook 的精選貼文
BRUNO 人物專訪:Carlos (Part 2)
愛地球的 SEE Breere 環保保鮮盒
20150202
Bruno Huang
布魯諾國際品牌顧問 執行總監
Vs
Fumimasa Carlos Kise
來自日本+玻利維亞的愛地球環保達人
SEE Breere 保鮮盒
Breere food container
產品八大特色
植物原料無毒安心
人因設計好用好收
黃金斜面循環保鮮
獨特氣孔自然排氣
綠色設計減碳環保
圓弧曲線容易清理
P型溝槽密合防漏
造型簡潔俐落大方
通過LFGB食品容器安全檢驗
經過美國BETA實驗室檢驗證明
盒身生質材料含量為96%
Breere Cap
產品特色
精緻貼心設計的造型氣孔蓋,可隨內容物的不同,
更換不同的造型,增添食物保存上的樂趣。
繽紛多彩的造型,除了標準基本色外,
會隨季節及節慶推出趣味色系及特殊造型款式。
樹脂原料:矽膠 (SILICONE)
耐熱溫度:230 ℃
耐冷溫度: -50 ℃
通過LFGB食品容器安全檢驗
About SEE
我們本著 『樂活生活、 愛地球 』的願景為出發點,
將我們奠基在傳統產業將近40年的根本加以活用。
提出破壞性創新的思維創造企業轉型,
破釜沉舟地創新邁向新市場,
從製造業的框架轉型為服務業的架構,以“服務”概念出發。
2008年投入綠色商品與綠色素材的開發,
專心致力於綠色創新工程的開發與原料的運用。
2011年正式導入專用生產線,
主要針對綠色產品及減碳系列商品為開發主軸,
並提供從材料使用建議、產品開發與設計、生產、販售等整合性服務。
2014年正式推出自品品牌系列廚房用品
官方網站:
http://see-gaia.com/Page/Product/ProductList.aspx
經銷據點:
http://see-gaia.com/Page/BranchOffice/BranchOffice.aspx
--------------------------
Bruno Huang 官方連結:
Official Facebook:https://www.facebook.com/brunohuangofficial
YouTube Channel:https://www.youtube.com/user/brunohuang
BIBC 布魯諾國際品牌顧問
官網:http://www.bibcgroup.com/
FB:http://www.facebook.com/brunoconsulting