雖然這篇emulsify recipe鄉民發文沒有被收入到精華區:在emulsify recipe這個話題中,我們另外找到其它相關的精選爆讚文章
在 emulsify產品中有35篇Facebook貼文,粉絲數超過2萬的網紅Ferrarossa Beauty,也在其Facebook貼文中提到, Bila dengar pencuci muka yang jenis oil cleanser ni cepat-cepat jauhkan diri sebab takut kulit muka breakout kan? Haa siapa macam tu? Iya la, breakout...
同時也有10部Youtube影片,追蹤數超過0的網紅cook kafemaru,也在其Youtube影片中提到,久しぶりにチョコマフィンが食べたくなったので、色々とレシピを いじっていました。 生クリームとオイルで焼いてみたんですが、濃厚さに欠けたので 今度は生クリームと溶かしバターで、ココアも少し多めに加えて 焼いてみたところ、すごく美味しくできたので、シェアします。 この実験により、日ごろのオートミールの...
「emulsify」的推薦目錄
- 關於emulsify 在 Jolene Journe Instagram 的精選貼文
- 關於emulsify 在 Tasty Japan Instagram 的精選貼文
- 關於emulsify 在 Agnes Chee謝嫣薇 Instagram 的最讚貼文
- 關於emulsify 在 Ferrarossa Beauty Facebook 的最讚貼文
- 關於emulsify 在 Ferrarossa Beauty Facebook 的最佳貼文
- 關於emulsify 在 Ferrarossa Beauty Facebook 的最佳貼文
- 關於emulsify 在 cook kafemaru Youtube 的最佳解答
- 關於emulsify 在 生かし屋 IKASHIYA CULINARY ART Youtube 的最佳解答
- 關於emulsify 在 Tasty Japan Youtube 的最佳貼文
emulsify 在 Jolene Journe Instagram 的精選貼文
2021-09-10 18:57:15
Sharing some of my favorites from Shu Uemura 💄 Have you tried their cleansing oil? The Anti/Oxi+ green bottle is my favorite! It exfoliates and remov...
emulsify 在 Tasty Japan Instagram 的精選貼文
2021-05-02 23:25:37
たったこれだけで和風アレンジ!簡単ペペロンチーノ / Japanese Style Peperoncino With Garlic ㅤㅤㅤㅤㅤㅤㅤㅤㅤㅤㅤㅤㅤ 作ったら #tastyjapan をつけて投稿してくださいね!✨ ㅤㅤㅤㅤㅤㅤㅤㅤㅤㅤㅤㅤㅤ レシピはこちらをご覧ください♪ ㅤㅤㅤㅤㅤㅤㅤ...
emulsify 在 Agnes Chee謝嫣薇 Instagram 的最讚貼文
2021-03-30 09:48:41
(Continue from previous post) One of @guillaumegalliot significant style is to infuse fruit into his jus or dishes, resulting in multi-layered flavo...
-
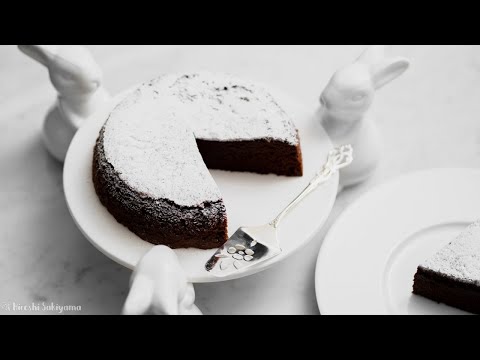
emulsify 在 cook kafemaru Youtube 的最佳解答
2021-09-06 19:17:31久しぶりにチョコマフィンが食べたくなったので、色々とレシピを
いじっていました。
生クリームとオイルで焼いてみたんですが、濃厚さに欠けたので
今度は生クリームと溶かしバターで、ココアも少し多めに加えて
焼いてみたところ、すごく美味しくできたので、シェアします。
この実験により、日ごろのオートミールの成果は消滅したものと
思われます、、、笑
レシピは下にあります↓
フォロー&いいね! も お願いします!!!!!!
twitter
https://twitter.com/cookkafemaru
instagram
https://www.instagram.com/kafemaru/?hl=ja
Blogブログ始めました。
右も左も分からずまだまだですが、毎日すこしずつ、まとめつつ書いています、良かったら遊びにきてください^^
https://ameblo.jp/28280807
==================================================
大人気YouTuber “cook kafemaru”の
「罪深いスイーツ」
Amazonはこちらから購入できます↓↓↓
https://www.amazon.co.jp//dp/4046048948/
「世界一作りやすいおうちスイーツ 」
https://www.amazon.co.jp/dp/4046045116/
もしもお住いの近くの本屋さんになかったら、セブンイレブンの
オムニ7でネット予約し、セブンイレブン店頭受け取りで買うことができます!
=============================================
【Ingredients】Make 6 Muffins(Caliber 6cm ,Bottom diameter 4.8cm
Height 4cm)
1 Egg(55g) room temperature
60g granulated sugar
35g Melted butter(Unsalted butter)
100g Heavy Whipping cream (35% fat)
★100g Cake flour
★35g Cocoa powder
★3g Baking powder
For Toppings: 50g Dark chocolate
Fold the chocolate by hand.
【Directions】
①Add granulated sugar to the egg .
②Pour the melted butter( little by little in it while stirring. Make it smooth. (Emulsify it.)
③Add the heavy whipping cream and stir.
④Sift the dry ingredients (★) over it.
⑤Mix well until combined.
preheat the oven to 170℃(338 °F)
⑥Transfer the batter to a piping bag.
Pipe the batter into each cup.
(or put the batter with a spoon in each cup. )
⑦Top with dark chocolate.
Push them in lightly.
⑧Bake at 170℃(338°F)for 16 minutes.
It's all done!
*When the heat went away, put it in a plastic bag or wrap it.
***れしぴ置き場***
【材料】マフイン6個分
卵(M~Lサイズ位 殻無しで55g)室温
グラニュー糖 60g
溶かしバター(無塩) 35g
生クリーム 100g (脂肪分 35%)
★薄力粉 100g
★ココアパウダー 35g
★ベーキングパウダー 3g
For Toppings:ビターチョコレート 50g
チョコは手で折っておく。
【作り方】
①ボウルに卵を割り入れグラニュー糖を加える。
②溶かしバターを少しずつ加えながら混ぜる(乳化させる)
③生クリームを加えて混ぜる。
④材料(★)をふるって加える。
⑤ゴムベラで混ぜ合わせる。
オーブンを170℃に予熱する。
⑥絞り袋に生地をうつし、カップに均等に絞り入れる。
(絞った方が綺麗に入るので、絞り袋が無ければビニール袋に
入れてやってみてください。スプーンですくって入れてもok)
⑦チョコを上に乗せる。膨らんだ時に落ちないように、少し
押し込むように乗せると良い。
⑧170℃に温まったオーブンで16分焼いて出来上がり!
●焼き方と保存
*焼き過ぎると生地がパサつきますので焼き過ぎないようにしてください。冷めたら乾燥させないようビニール袋などに入れましょう。
●マフィンカップのサイズ
口径が6cm,底が4.8cm,高さが4cmです。
100均のマフィンカップですとMサイズくらいなのかなと思いますが、あまり大きな型に入れてしまうと個数が取れずにボリュームも出ませんので、むしろ小さ目サイズで焼いても良いと思います。
その場合、火の通りが早いので、少し焼き時間を短くするなど、調整してください。
●お砂糖の役割
甘みをつけるだけでなく、気泡を安定させ生地を膨らませてくれたりまた水分を保つ役割もあるので、しっとりとした焼き上がりになります。
お砂糖を減らすと生地があまり膨らまず焼き上がりが固くなってしまうこともありますのでご注意ください。
●生クリームは牛乳には置き換えないでください。
脂肪分が35%のものがないときは、植物性ホイップクリームでもokです。
●アーモンドプードル入りで作りたいときは、100gの薄力粉のうち20-30gをアーモンドプードルに置き換えてください。![post-title]()
-
emulsify 在 生かし屋 IKASHIYA CULINARY ART Youtube 的最佳解答
2020-12-21 14:24:44しっとり濃厚ながら、粉が多めの配合でふんわり軽めの凹まないタイプのガトーショコラです
よりずっしり濃厚な凹むタイプはまた今度やります
ガトーショコラが凹むのは↓あたりが要因
・へこむ配合である(ふくらみ、それを支える粉類が少ない)
・中心に火が入っていない
・焼き上がり時の蒸気が生地を巻き込んでしぼむ
なのでココアパウダーを多めの配合し、生地を温かい状態に保ち、しっかりツヤのあるきめ細かいメレンゲを作って、焼き上がりに打ち付け蒸気を抜いてなるべく焼き縮みしないように作ります
同じガトーショコラでも食感や味わいが全然違うので、気分によって作り分けられるといいですね
【材料】
15cm
・チョコレート 45g
・生クリーム 45g
・バター 35g
・卵黄 2個分
・薄力粉 13g
・ココアパウダー 27g
・卵白 2個分
・グラニュー糖 67g
18cm
・チョコレート 67g
・生クリーム 67g
・バター 53g
・卵黄 3個分
・薄力粉 20g
・ココアパウダー 40g
・卵白 3個分
・グラニュー糖 100g
【準備】
・湯煎用のお湯を用意する(70~80℃程度)
・湯煎焼き用のお湯を用意する(80°程度)
・デコ型(丸いケーキ型)に敷き紙を敷き、底取れならアルミホイルで底を覆う
・薄力粉、ココアパウダーはふるって使う
・天板ごとオーブンを140°に予熱する
【作り方】
1. ボウルにチョコレート・生クリーム・バターを入れて湯煎で溶かし混ぜ乳化させ、卵黄を加えて手早く混ぜる
2. 別のボウルに卵白を入れてハンドミキサーで泡立て、軽く泡立ったらグラニュー糖を3回に分けて加え、その都度ツヤが出て溶け込むまで泡立てる
3. 角がお辞儀するくらいまで泡立てたら低速に切り替えてキメを整え、きめ細かくツヤがあるしっかりしたメレンゲにする
4. チョコの生地にメレンゲの1/3を加えて泡立て器orヘラでさっくりと混ぜ、混ざりきらないマーブル状の状態で薄力粉・ココアパウダーをふるい入れる
5. 同様にさっくりと混ぜ合わせ、粉っぽさがなくなったら残りのメレンゲをさらに2回に分けて加えさっくりと混ぜ合わせる
6. 最後にヘラで切り混ぜ生地を均一に整え完全に混ざったら、型紙を敷いたデコ型に流し入れ、竹串で数周ぐるぐるして生地の状態を均一にする
7. 140℃に予熱したオーブンで40分湯煎焼きし、焼き上がりすぐに数回落として蒸気を抜いて冷ます
--------------------------------------------------------------------------
【動画でよく使ってる調理器具】
フライパン(20cm):https://amzn.to/2QyY1ny
フライパン(24cm):https://amzn.to/2UtNvz5
フライパン(24cm深型):https://amzn.to/3dj5DEp
鉄フライパン(22cm):https://amzn.to/3a8hqmR
アルミフライパン(24cm):https://amzn.to/3dj6tRz
片手浅型鍋(18cm):https://amzn.to/2QzGXha
片手浅型鍋(21cm):https://amzn.to/2U7ta3o
片手鍋(16cm):https://amzn.to/2QzCj2x
片手鍋(20cm):https://amzn.to/3bd0lZa
ソースパン:https://amzn.to/2U9keuI
まな板:https://amzn.to/2J1fQHI
ガスコンロ:https://amzn.to/3bdtvYa
牛刀:https://www.jikko.jp/fs/jikko/54803
ペティ:https://www.jikko.jp/fs/jikko/54800
撮影機材
カメラボディ:https://amzn.to/2xSXZAd
動画レンズ:https://amzn.to/2UteU3V
写真レンズ:https://amzn.to/2U7HcCb
録音:https://amzn.to/2U9cGYT
※製品のURLはAmazonアソシエイトのリンクを使用しています
--------------------------------------------------------------------------
▼サブチャンネル(料理実験チャンネル)
https://www.youtube.com/channel/UCqIW0OHh8k2np5ZNz3wz8sg
▼ブログ
http://www.ikashiya.com/
▼Twitter
https://twitter.com/sakihirocl
▼Instagram
https://www.instagram.com/sakiyamahiroshi/
--------------------------------------------------------------------------
↓using translation software.
[Ingredients]
15 cm
・Chocolate 45 g
・45 g fresh cream
・35 g butter
・2 egg yolks
・13 g cake flour
・Cocoa powder 27 g
・2 egg whites
・67 g granulated sugar
18 cm
・Chocolate 67 g
・67 g fresh cream
・53 g butter
・3 egg yolks
・20 g cake flour
・Cocoa powder 40 g
・3 egg whites
・100 g granulated sugar
[Preparation]
・Prepare hot water for warming in hot water (about 70 ~ 80 ° C).
・Prepare hot water for warming in hot water (about 80 °).
・Cover a decorative mold (round cake mold) with baking paper. Cover the bottom with aluminum foil if you can remove the bottom.
・Sift weak flour and cocoa powder.
・Preheat the oven together with the baking sheet to 140 ° C.
[How to make]
1. Add chocolate, whipping cream and butter in a bowl and melt it over hot water. Let it emulsify then add egg yolk and quickly mix it.
2. Put the egg white in another bowl and whip it with a hand mixer. Add granulated sugar in 3 steps when it lightly bubbles. Whip it until it becomes glossy and melts each time you add it.
3. Whip it until the corners bow then switch it to low-speed to adjust the texture and make it into a fine and glossy firm meringue.
4. Add 1/3 of the meringue to the chocolate mixture and lightly mix it with a whisk or spatula. Sift in weak flour and cocoa powder while it is in a marble-like state that doesn't mix.
5. Mix it lightly in the same way. Add the rest of the meringue in 2 more steps when the powdery feel is gone and mix it lightly.
6. Finally, cut and mix it with a spatula. After it is mixed completely, pour it into a decoration mold covered with pattern paper. Use a bamboo skewer to turn it around several times to make the state of the dough even.
7.Bake it in the oven preheated to 140 ° C for 40 minutes over hot water. Drop it several times right after it finishes baking to release the steam then let it cool.![post-title]()
-
emulsify 在 Tasty Japan Youtube 的最佳貼文
2020-10-07 16:00:12パスタのレシピをご紹介します!
今回はペペロンチーノ。醤油で味付けてトッピングとして大葉を散らし、和風に仕立てました。
優しい味付けにガツンとにんにくのアクセントがしっかりしていてやみつきになります!!
材料もコストもかからないので節約にもなります♪
とっても美味しいので、ぜひ作ってみてくださいね!
簡単ペペロンチーノ
2人分
材料:
スパゲッティ(1.4mm) 160g
にんにく(スライス) 2片
にんにく(みじん切り) 2片
赤唐辛子(輪切り) 1本
スライスベーコン(1cm細切り) 50g
オリーブオイル 大さじ2
スパゲッティの茹で汁 50ml
しょうゆ 大さじ1
塩 少々
コショウ 少々
大葉(みじん切り) 2枚
作り方:
1. 鍋にたっぷりの湯を沸かして塩を溶かし(湯1ℓに対して塩10gが目安)、スパゲッティを袋の表記時間より1分短く茹でる。茹で上がったらザルに上げて湯を切り、茹で汁は取って置く。
2. フライパンに半量のオリーブオイル、にんにく(スライス)を入れて弱火にかけ、きつね色になったら皿に取り出す。(トッピングに使用する。)
3. (2)のフライパンに、にんにく(みじん切り)、赤唐辛子を入れて再び火にかけ、香りが立ったらベーコンを加えて炒める。
4. 茹で汁を加え、煮立ったら残りのオリーブオイルを加えフライパンを揺すりながら水分とオイルを乳化させる。
5. (1)のスパゲッティを加えてしょうゆを回し入れ、汁気がなくなるまで混ぜ合わせる。塩、コショウで味を調える。
6.皿に盛り、トッピング用のにんにくチップをのせ、大葉を散らしたら、完成!
===
Here is what you'll need!
---
Garlic scent Spaghetti aglio e olio with soy sauce
Servings: 2
INGREDIENTS
160g spaghetti (1.4mm)
2 tablespoons olive oil
2 cloves garlic (sliced)
2 cloves garlic (minced)
1 chilli pepper (sliced)
50g bacon (sliced)
50ml pasta water
1 tablespoon soy sauce
A pinch salt and pepper
2 perilla (shiso) leaves (chopped)
PREPARATION
1. Put a pot of salted water on to boil and cook spaghetti. Cook 1 minute shorter than a recommended cooking time on the pasta package. Reserve some pasta water (50ml). Drain pasta into a colander.
2. Heat olive oil and sliced garlic over low heat until beautifully golden. Transfer garlic to a plate. (Save for toppings.)
3. Stir fry minced garlic and chili pepper in the same pan. Add bacon.
4. Add reserved pasta water. When it comes to a boil, add the remaining olive oil. Stir and toss to make the oil to emulsify.
5. Put spaghetti back into the pan and pour soy sauce. Stir until the sauce thickened. Season with salt and pepper.
6. Transfer spaghetti to a plate. Put sliced garlic (2) and perilla leaves on top.
7. Enjoy!
---
Check us out on Twitter! https://twitter.com/TastyJapan
Check us out on Instagram! https://www.instagram.com/tastyjapan/
#TastyJapan #レシピ
MUSIC
Licensed via Audio Network![post-title]()


emulsify 在 Ferrarossa Beauty Facebook 的最讚貼文
Bila dengar pencuci muka yang jenis oil cleanser ni cepat-cepat jauhkan diri sebab takut kulit muka breakout kan? Haa siapa macam tu? Iya la, breakout boleh berlaku bila pori tersumbat.
Tapi tak perlu risau tau, kebanyakkan oil cleanser akan larut air seperti makeup melter ni. Sebab tu bila dah dibilas dengan air, memang takkan tinggalkan kesan berminyak. It is 100% emulsify with water tau!
Makeup melter ni gunakan teknik oil pulling untuk bersihkan kulit muka you all, sebab tu melter ni memang bagus untuk bersihkan makeup & buang blackheads juga. Kulit pun jadi bersih dan lembut. 😍
So masih ragu-ragu ke nak guna makeup melter ni?
#skincare #beauty #skincareroutine #makeup #skin #skincareproducts #skincaretips #selfcare #glowingskin #antiaging #cosmetics #healthyskin #instagood #facial #natural #serum #acne #naturalskincare #perawatanwajah #kosmetik #mua #cleansingoil #rosetoner #roseserum
emulsify 在 Ferrarossa Beauty Facebook 的最佳貼文
Rose Makeup Melter is an oil cleanser that won't leave oily after feel and amazingly 100% emulsify bila dibilas dengan air & langsung tak pedihkan mata.
And if you are a fan of double cleansing, boleh gunakan Rose Makeup Melter first then gunakan your water based cleanser seperti Dermova Cream Cleanser. Bila bersihkan kulit muka dengan betul, skin akan lebih flawless. Dah ready nak dapatkan kulit gorgeous raya nanti? Ehem, kene la mulakan jaga kulit dari sekarang tau.
Psst, siapa kat sini yang dah jatuh chenta dengan Rose Makeup Melter? 🙋🌹
Credit picture to @ainilmoochi ❤️
#skincare #beauty #skincareroutine #makeup #skin #skincareproducts #skincaretips #selfcare #glowingskin #antiaging #cosmetics #healthyskin #instagood #facial #natural #serum #acne #naturalskincare #perawatanwajah #kosmetik #mua #cleansingoil #rosetoner #roseserum
emulsify 在 Ferrarossa Beauty Facebook 的最佳貼文
Super love this new Soothing Rose Makeup Melter & Rose Gel Toner yang dari Korea ni. Dedua ada bau geranium yang premium. Texture Rose Makeup Melter sangat soothing, tak pedihkan mata dan paling penting akan emulsify 100% bila bercampur dengan air.
Rose Gel Toner pula, a hydrating toner yang sesuai sangat dipakai selepas bersihkan muka. Bila pakai toner, kulit muka lebih tersedia untuk penyerapan nutrient dari serum & moisturizer.
Best ke tak best duo ni?
#skincare #beauty #skincareroutine #makeup #skin #skincareproducts #skincaretips #selfcare #glowingskin #antiaging #cosmetics #healthyskin #instagood #facial #natural #serum #acne #naturalskincare #perawatanwajah #kosmetik #mua #cleansingoil #rosetoner #roseserum