雖然這篇Shaping machine鄉民發文沒有被收入到精華區:在Shaping machine這個話題中,我們另外找到其它相關的精選爆讚文章
在 shaping產品中有937篇Facebook貼文,粉絲數超過11萬的網紅小凱老師,也在其Facebook貼文中提到, 【凱學院】新手修容必看教學!質地選用、修容位置,一次搞懂! 時下妝容必備的修容步驟,可以讓你雕塑出立體精緻的五官輪廓~但依然很多人不知道也很害怕修容,不知道應該修哪裡,下多重,什麼時候用修容膏,什麼時候用修容粉?今天凱咪就要解開你的疑惑,讓你不在害怕修容! 👇今天用了它們👇 1. Makeup ...
同時也有323部Youtube影片,追蹤數超過14萬的網紅KAITV 小凱老師影音頻道,也在其Youtube影片中提到,時下妝容必備的修容步驟,可以讓你雕塑出立體精緻的五官輪廓~但依然很多人不知道也很害怕修容,不知道應該修哪裡,下多重,什麼時候用修容膏,什麼時候用修容粉?今天凱咪就要解開你的疑惑,讓你不在害怕修容! 👇今天用了它們👇 1. Makeup By Mario | Softsculpt Shaping S...
「shaping」的推薦目錄
- 關於shaping 在 www.alhaalfa.com Instagram 的最讚貼文
- 關於shaping 在 ??????? ????? ????? ?? Instagram 的最讚貼文
- 關於shaping 在 Kazunori Hamana Instagram 的最讚貼文
- 關於shaping 在 小凱老師 Facebook 的最讚貼文
- 關於shaping 在 Bao Tranchi Facebook 的精選貼文
- 關於shaping 在 Sp Saypan Facebook 的精選貼文
- 關於shaping 在 KAITV 小凱老師影音頻道 Youtube 的最佳解答
- 關於shaping 在 生かし屋 IKASHIYA CULINARY ART Youtube 的精選貼文
- 關於shaping 在 生かし屋 IKASHIYA CULINARY ART Youtube 的精選貼文
shaping 在 www.alhaalfa.com Instagram 的最讚貼文
2021-10-02 16:52:08
ESOK MALAM KITE LAUNCHING TINTED BROW SHAPING WAX ini!! siapa cepat dia dapat!! limited edition..ada 10k set sahaja! haaa semoga ilmu ni bermanfaat ut...
shaping 在 ??????? ????? ????? ?? Instagram 的最讚貼文
2021-09-24 02:52:18
Here my brow routine with @sofwanahcosmetics ! Featuring their one and only Mesmerize Brows in Coffee! A soft wax retractable brow pencil with a pr...
shaping 在 Kazunori Hamana Instagram 的最讚貼文
2021-09-24 06:24:18
Reposted from @fogfair @blumandpoe Los Angeles is presenting an exhibition of ceramic works by artist Kazunori Hamana in collaboration with Yukiko Kur...
-
shaping 在 KAITV 小凱老師影音頻道 Youtube 的最佳解答
2021-09-23 11:00:16時下妝容必備的修容步驟,可以讓你雕塑出立體精緻的五官輪廓~但依然很多人不知道也很害怕修容,不知道應該修哪裡,下多重,什麼時候用修容膏,什麼時候用修容粉?今天凱咪就要解開你的疑惑,讓你不在害怕修容!
👇今天用了它們👇
1. Makeup By Mario | Softsculpt Shaping Stick #Light Medium
2. Pat McGrath | Skin Fetish : Sublime Perfection Highlighting Brush
3. Etude | 修飾專家雙色修容餅 #2
4. KAIBEAUTY | 訂製輪廓刷 #F03
5. KKW Beauty | Brightening Powder #1
⭕️別忘了訂閱頻道⭕️開啟小鈴鐺🔔
➡️記得關注我的IG.FB粉絲專頁唷!
-----------------------------
IG: https://www.instagram.com/kai_makeup_/
FB: https://www.facebook.com/kaimakeuptw/![post-title]()
-
shaping 在 生かし屋 IKASHIYA CULINARY ART Youtube 的精選貼文
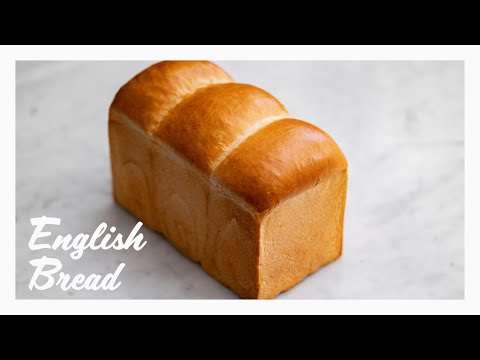
2021-09-03 10:36:29ストレート法で作る基本の山食パン(山型食パン・イギリス食パン)の作り方です
ストレート法は最初から材料をすべて合わせる作り方で、
メリット:短時間で出来る、風味が良い
デメリット:ボリュームが出にくい、でんぷんの老化がはやい=すぐぱさつく
という特徴があります
おすすめの強力粉は窯伸びの良い「スーパーキングやゴールデンヨット」、老化が遅く風味もいいし窯伸びもいいし作業もしやすい「ベルムーラン」がおすすめです(動画ではベルムーランを使用)
【型生地比容積について】
自分の持っている型に合わせて生地量を調整します
1.5斤と書かれてても1.2斤しかなかったり、型によって全然違うので必須です
この型と容量と生地の比率を型生地比容積といいます
型の容量÷型生地比容積=生地量
例:1625ml(1斤弱)÷3.5=約464g
3つに分けて入れる場合は1つあたり464÷3=155gになります
型生地比容積の目安
角食:3.8~4
山食:3.6前後
(数字が大きいほどふわふわで、数字が小さいほどみっちり)
ベーカーズパーセントと比容積からレシピの調整も出来ますが、
計算が面倒なので粉300gとか多めに作って生地量を食パンに使い
残りの生地は丸パンなどにすると楽だし無駄になりません
型生地比容積についてより詳しくは↓
https://www.ikashiya.com/entry/katakiji-hiyouseki
【材料】
ベーカーズパーセント(合計:194)
・強力粉 100
・砂糖 8
・スキムミルク 3
・塩 2
・インスタントドライイースト 1
・水 72
・バター 8
粉300での分量(1斤目安)
・強力粉 300g
・砂糖 24g
・スキムミルク 9g
・塩 6g
・インスタントドライイースト 3g
・水 216g
・バター 24g
【準備】
・バターを常温においておく
・型に離型油を塗る
【作り方】
1. 【生地作り~1次発酵】バター以外の材料をすべて合わせてグルテン膜が出るまでこね、バターを加えてさらにこねる
2. より薄いグルテン膜が出るまでこね(こね上げ26℃目安)、丸めてボウルに入れてラップをし30℃で60分発酵させて、打ち粉をして台に取り出す
3. 上から押さえてガスを抜いて広げ、上下左右から3つ折り×2で折りたたみボウルに入れてラップをし、30℃で30分発酵させる
4. 【分割~ベンチタイム】生地量の1/3ずつに分割してガスを抜き、きれいな面が外側にし表面を張らせるように丸める
5. かたく絞った濡れ布巾をかけて25分ベンチタイム(生地をゆるめて成形しやすくする/残った生地は同様にして丸パンなどに活用)
6. 【成形~2次発酵】めん棒で長方形にのばしつつガスを抜き(周りの気泡は手で潰す)、上下から1/3折りたたんで生地をくっつける
7. 奥から手前に少し張らせるように巻いてとじる(最初芯を作り、トップを持って下にくっつけるイメージで3回転~3回転半)
8. 離型油を塗った型に端→真ん中の順で入れ、蓋をして35℃で50分を目安に2次発酵(オーブンで発酵させる場合は予熱時間を考慮しはやめに取り出す)
9. 【焼成/180℃に予熱】生地が型のギリギリまで膨らんだら発酵完了、180℃に予熱したオーブンで焼成する
10. 180℃で30分を目安に焼き、焼き上がったら台に2~3回落として蒸気を抜き(腰折れを防ぐため)、すぐに取り出し冷ます
--------------------------------------------------------------------------
【動画でよく使ってる調理器具】
フライパン(20cm):https://amzn.to/2QyY1ny
フライパン(24cm):https://amzn.to/2UtNvz5
フライパン(24cm深型):https://amzn.to/3dj5DEp
鉄フライパン(22cm):https://amzn.to/3a8hqmR
アルミフライパン(24cm):https://amzn.to/3dj6tRz
片手浅型鍋(18cm):https://amzn.to/2QzGXha
片手浅型鍋(21cm):https://amzn.to/2U7ta3o
片手鍋(16cm):https://amzn.to/2QzCj2x
片手鍋(20cm):https://amzn.to/3bd0lZa
ソースパン:https://amzn.to/2U9keuI
まな板:https://amzn.to/2J1fQHI
ガスコンロ:https://amzn.to/3bdtvYa
牛刀:https://www.jikko.jp/fs/jikko/54803
ペティ:https://www.jikko.jp/fs/jikko/54800
撮影機材
カメラボディ:https://amzn.to/2xSXZAd
動画レンズ:https://amzn.to/3t7sfPB
写真レンズ:https://amzn.to/2U7HcCb
録音:https://amzn.to/2U9cGYT
※製品のURLはAmazonアソシエイトのリンクを使用しています
--------------------------------------------------------------------------
▼サブチャンネル(料理実験チャンネル)
https://www.youtube.com/channel/UCqIW0OHh8k2np5ZNz3wz8sg
▼ブログ
http://www.ikashiya.com/
▼Twitter
https://twitter.com/sakihirocl
▼Instagram
https://www.instagram.com/sakiyamahiroshi/
--------------------------------------------------------------------------
↓using translation software.
[Ingredients]
Bakers percent (total: 194)
・Bread flour 100
・Sugar 8
・Skim Milk 3
・Salt 2
・Instant dry yeast 1
・Water 72
・Butter 8
The amount of the flour 300.
・Bread flour 300 g
・Sugar 24 g
・Skim milk 9g
・Salt 6g
・Instant dry yeast 3g
・Water 216 g
・Butter 24 g
[Preparation]
・Leave the butter at room temperature.
・Spread mold release oil on the mold.
[How to make]
1. [Making the dough ~ primary fermentation] Mix all the ingredients except butter and knead it until the gluten film comes out. Add butter and knead it more.
2. Knead it (knead it up to around 26 °C) until a thinner gluten film comes out. Round it and put it in a bowl. Cover it with a plastic wrap and let it ferment for 60 minutes at 30 °C. Dust it with flour and take it out on a counter top.
3. Press down from the top to release the gas and spread it out. Fold it 3 times from top, bottom, left and right. Put it in a bowl and wrap it then ferment it for 30 minutes at 30 °C.
4. [Divide ~ bench time] Divide it to 1/3 of the amount of the dough then release the gas. Round it so the clean side is on the outside and the surface will stretch.
5. Cover it with a tightly squeezed damp dishcloth and bench it for 25 minutes (loosen the dough to make it easier to shape it/use the rest of the dough in the same way for round bread, etc.).
6. [Shaping ~ Secondary fermentation] Stretch it to a rectangle with a rolling pin and release the gas (crush the air bubbles around it with your hand). Fold it from the top and bottom to 1/3 and stick the dough together.
7. Roll it up and close it so that it is slightly stretched from the back to the front (Make the core first and hold the top and stick it on the bottom. Turn it around 3-3.5 times.).
8. Put it in the mold spread with mold release oil in the order of the edge to the center. Cover the lid and let it undergo secondary fermentation at 35 °C for around 50 minutes (take it out without considering the preheating time if you are fermenting it in the oven).
9. [Bake/Preheat to 180 °C] When the dough rises to the edge of the mold, the fermentation is complete. Bake it in the oven preheated to 180 °C.
10.Bake it at 180 °C for around 30 minutes. When it finishes baking, drop it on a counter 2 ~ 3 times to remove the steam (to prevent it from breaking around the waist). Take it out immediately and let it cool.![post-title]()
-
shaping 在 生かし屋 IKASHIYA CULINARY ART Youtube 的精選貼文
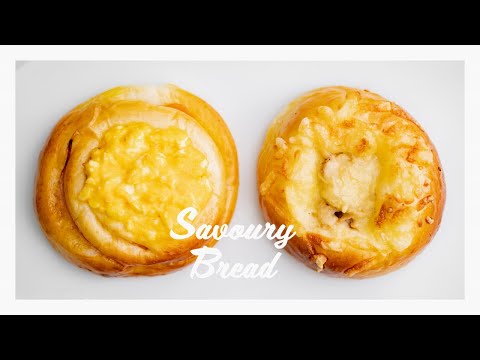
2021-08-07 09:55:231つの生地でいろいろ作れる惣菜パンのレシピ
ウインナーパン、ツナマヨパン、たまごハムパン等を作ってます
【材料】
生地
・強力粉 300g
・砂糖 30g
・スキムミルク 10g
・塩 5g
・インスタントドライイースト 3g
・水 204g
・バター 40g
たまごサラダ
・茹で卵 3個
・マヨネーズ 大さじ2
・オリーブオイル 大さじ1
・塩 ひとつまみ
・胡椒 少々
ツナマヨ
・ツナ缶 小1缶
・マヨネーズ 大さじ1
・塩 少々~ひとつまみ
・黒胡椒 少々
その他具材例
・ほうれん草やピーマンなど
・ベーコンやウインナーやハム
・チーズやマヨネーズ
【準備】
・バターを室温に置いておく
【作り方】
1. 【こね~1次発酵】生地のバター以外の材料を合わせてヘラで混ぜ、まとまったら台に取り出してこねていく
2. グルテン膜が出来るまでこねたらバターを加えてちぎるようにして馴染ませ、再び薄いグルテン膜が出来るまでこねる
3. 丸めてボウルに入れてラップをし、30℃で50分を目安に2倍ほどに膨らむまで1次発酵(指で粉を付けて穴をあけ、穴が少しだけ縮んで元に戻らなければOK)
4. 【具材の準備】ベーコンは1cm角にカットし、ほうれん草は熱湯でさっと茹でて流水で冷やし、しっかり水気を絞って2cmほどにカットする
5. 【分割~ベンチタイム】生地を1個60gずつに分割し、ガスを抜いて丸めてかたく絞った濡れ布巾をかけてベンチタイム15分
6. 【成形~2次発酵】
・楕円:手のひらで生地を円形で潰してのばし上下から1/3ずつ折りたたみ、さらに中心で折り合わせてとじる
・丸:ガス抜きして丸め直す
・ハム:ハムよりひと回り大きく手のひらで生地を円形で潰してのばし、ハムを置いてくるくると巻き、両端を合わせるように折ってとじ、縦にして端から1/3を残して切れ込みを入れて円形に広げる
7. オーブン用シートを敷いた天板に並べ、35℃で45分を目安に2次発酵(オーブンで発酵する場合、予熱時間を考慮しはやめに取り出す)
8. 【焼成/220℃に予熱】
・楕円:カミソリやナイフで中心に切れ込みを入れ、上に具材をのせる
・丸:頂点にハサミで十字に切れ込みを入れ、少し広げて具材をのせる
・ハム:上にチーズやたまごサラダをのせる(シンプルにそのまま焼いてもOK)
(照りを出したい場合、好みで溶いた全卵を塗る)
9. 220℃に予熱したオーブンで13分を目安に、底面に焼き色がつくまで焼いて出来上がり
--------------------------------------------------------------------------
【動画でよく使ってる調理器具】
フライパン(20cm):https://amzn.to/2QyY1ny
フライパン(24cm):https://amzn.to/2UtNvz5
フライパン(24cm深型):https://amzn.to/3dj5DEp
鉄フライパン(22cm):https://amzn.to/3a8hqmR
アルミフライパン(24cm):https://amzn.to/3dj6tRz
片手浅型鍋(18cm):https://amzn.to/2QzGXha
片手浅型鍋(21cm):https://amzn.to/2U7ta3o
片手鍋(16cm):https://amzn.to/2QzCj2x
片手鍋(20cm):https://amzn.to/3bd0lZa
ソースパン:https://amzn.to/2U9keuI
まな板:https://amzn.to/2J1fQHI
ガスコンロ:https://amzn.to/3bdtvYa
牛刀:https://www.jikko.jp/fs/jikko/54803
ペティ:https://www.jikko.jp/fs/jikko/54800
撮影機材
カメラボディ:https://amzn.to/2xSXZAd
動画レンズ:https://amzn.to/3t7sfPB
写真レンズ:https://amzn.to/2U7HcCb
録音:https://amzn.to/2U9cGYT
※製品のURLはAmazonアソシエイトのリンクを使用しています
--------------------------------------------------------------------------
▼サブチャンネル(料理実験チャンネル)
https://www.youtube.com/channel/UCqIW0OHh8k2np5ZNz3wz8sg
▼ブログ
http://www.ikashiya.com/
▼Twitter
https://twitter.com/sakihirocl
▼Instagram
https://www.instagram.com/sakiyamahiroshi/
--------------------------------------------------------------------------
↓using translation software.
[Ingredients]
[Ingredients]
dough
・Bread flour 300 g
・Sugar 30 g
・Skim milk 10 g
・Salt 5g
・Instant dry yeast 3g
・Water 204 g
・Butter 40 g
Egg salad
・Boiled eggs, 3 pieces
・2 tablespoons mayonnaise
・Olive oil 1 tablespoon
・a pinch of salt
・a pinch of pepper
Tuna Mayonnaise
・small can of tuna
・1 tablespoon mayonnaise
・a pinch of salt
・a pinch of black pepper
Examples of other ingredients
・Spinach, green pepper, etc.
・Bacon, wiener sausages, ham
・Cheese or mayonnaise
[Preparation]
・leave the butter at room temperature
[How to make]
1. [Knead ~ Primary fermentation] Mix all the ingredients except the butter of the dough together with a spatula. Take it out on a counter and knead it.
2. Knead it until the gluten film is formed then add butter and tear it to mix it together. Knead it again until a thin gluten film is formed.
3. Round it and put it in a bowl then wrap it. Let it undergo primary fermentation at 30 °C for around 50 minutes until it expands to around 2 times its size (Dust it with your finger and make a hole. It will be fine if the hole shrinks a bit and it doesn't return to its original shape.).
4. [Preparation of the ingredients] Cut the bacon into 1cm cubes, quickly boil the spinach in hot water and cool it under running water, squeeze out the moisture well and cut it into 2cm pieces.
5. [Divide ~ bench time] Divide the dough to 60 g each. Release the gas and round it. Cover it with a tightly squeezed damp dishcloth and bench time is 15 minutes.
6. [Shaping ~ Secondary Fermentation]
・Ellipse: Crush the dough into a circle with your palm and stretch it. Fold it from the top and bottom 1/3 at a time. Fold it in the center and close it.
・Round: Release the gas and round it again.
・Ham: Crush and stretch the dough in a circle with the palm of your hand one size larger than the ham. Place the ham and roll it up. Fold it so that both ends are joined. Make it vertical and make a cut leaving 1/3 from the edge and spread it out in a circle.
7. Line them up on a baking sheet covered with baking paper. Let it undergo secondary fermentation at 35 °C for around 45 minutes (When fermenting in the oven, take it out without considering the preheating time.).
8. [Baking/Preheating to 220 °C]
・Ellipse: Make a cut in the center with a razor or knife and place the ingredients on top.
・Round: Make a cross cut on the top with scissors, spread it out a little and put the ingredients on it.
・Ham: Top with cheese or egg salad (or simply bake)
(If you want to make it shiny, apply beaten whole egg if you like.)
9.Bake it in the oven preheated to 220 °C for around 13 minutes until the bottom browns and it will be complete.![post-title]()


shaping 在 小凱老師 Facebook 的最讚貼文
【凱學院】新手修容必看教學!質地選用、修容位置,一次搞懂!
時下妝容必備的修容步驟,可以讓你雕塑出立體精緻的五官輪廓~但依然很多人不知道也很害怕修容,不知道應該修哪裡,下多重,什麼時候用修容膏,什麼時候用修容粉?今天凱咪就要解開你的疑惑,讓你不在害怕修容!
👇今天用了它們👇
1. Makeup By Mario | Softsculpt Shaping Stick #Light Medium
2. Pat McGrath | Skin Fetish : Sublime Perfection Highlighting Brush
3. Etude | 修飾專家雙色修容餅 #2
4. KAIBEAUTY | 訂製輪廓刷 #F03
5. KKW Beauty | Brightening Powder #1
⭕️別忘了訂閱頻道⭕️開啟小鈴鐺🔔
➡️記得關注我的IG唷!
------------------------------
IG: https://www.instagram.com/kai_makeup_/
shaping 在 Bao Tranchi Facebook 的精選貼文
#fbf The UNSTOPPABLE MEG THEE STALLION Megan Thee Stallion] on the cover of Rolling Stone] magazine wearing our “BAD BLOOD” Bodysuit for the powerful “Women Shaping the Future” 2020 issue 🙌🏼👑👊🏼 - Repost • Rolling Stone] Here's a first look at our upcoming #WomenShapingTheFuture cover featuring @sza, Megan Thee Stallion] and @normani. Photograph by @campbelladdy.
#megtheestallion #baotranchi #rollingstone #cover #womenshapingthefuture #normani #sza
shaping 在 Sp Saypan Facebook 的精選貼文
Give Away💗🎂 Sp Saypan's Birthday
กิจกรรมที่ 6 จากแบรนด์ COCORO Cool Stretch Marks & Body Shaping แก้ผิวแตกลาย หน้าท้องย่น
ทำให้ผิวกระชับค่ะตัวนี้ แม่ท้องใช้ดีมากกกก
แจกใหญ่มาก 36 ชิ้นปังๆ จุกๆเลยค่าาาา
ราคา 1,350 บาท รวมมูลค่า 48,600บาทเลยค่าา
💗กติกา 💗
1 ชื่อเล่น จังหวัด
2 คุณคิดว่า คุณกดไลค์เพจ Sp Saypan เดือนไหนปีไหนคะ
3 เคยใช้ COCORO มั้ยคะ ทำไมถึงอยากลองตัวนี้คะ
มีปัญหาผิวไม่กระชับ หรือ ผิวแตกลายคะ
ประกาศผล วันที่ 22 ก.ย 2564 นี้ ใต้ post ค่ะ