雖然這篇Loosen synonym鄉民發文沒有被收入到精華區:在Loosen synonym這個話題中,我們另外找到其它相關的精選爆讚文章
在 loosen產品中有216篇Facebook貼文,粉絲數超過0的網紅,也在其Facebook貼文中提到, Welcome to the first episode of Lounge-LY! Have your drinks ready, loosen up your feet, and let’s get the party started! 💃🏻 #DJLokyii #LoungeLY #DJ #...
同時也有95部Youtube影片,追蹤數超過2萬的網紅生かし屋 IKASHIYA CULINARY ART,也在其Youtube影片中提到,ラム酒香るしっとりほろりな栗の渋皮煮入りパウンドケーキ、栗のテリーヌです 【材料】 18cmパウンド型 ・バター 100g ・きび砂糖orグラニュー糖 70g ・はちみつ 15g ・塩 ちょっぴり ・卵黄 2個 ・全卵 1個 ・薄力粉 60g ・アーモンドパウダー 30g ・ベーキングパウダー ...
「loosen」的推薦目錄
- 關於loosen 在 John Tan 陈浚 Instagram 的最佳貼文
- 關於loosen 在 ҼѕԵɧéɾ †ᵉᵒ | Տɢ Ƒood . ƉɾíղƘ Instagram 的最讚貼文
- 關於loosen 在 Olimpia Wong Instagram 的精選貼文
- 關於loosen 在 Facebook 的最讚貼文
- 關於loosen 在 Chris Leong Facebook 的最佳解答
- 關於loosen 在 Chris Leong Facebook 的最讚貼文
- 關於loosen 在 生かし屋 IKASHIYA CULINARY ART Youtube 的最佳解答
- 關於loosen 在 生かし屋 IKASHIYA CULINARY ART Youtube 的精選貼文
- 關於loosen 在 生かし屋 IKASHIYA CULINARY ART Youtube 的最佳貼文
loosen 在 John Tan 陈浚 Instagram 的最佳貼文
2021-09-15 15:54:15
Great way to loosen up muscle tightness with foam roller....
loosen 在 ҼѕԵɧéɾ †ᵉᵒ | Տɢ Ƒood . ƉɾíղƘ Instagram 的最讚貼文
2021-09-17 06:49:14
I love one pot meal and especially spicy curry vegetables where I get to add different ingredients that I like! I’ve been trying a few brands of curry...
loosen 在 Olimpia Wong Instagram 的精選貼文
2021-09-15 14:02:07
Enjoy weekend and loosen-up 😊 Key to paint loosely : - paper size not too small - good brushes - paper that you can brush colour off easily - add en...
-
loosen 在 生かし屋 IKASHIYA CULINARY ART Youtube 的最佳解答
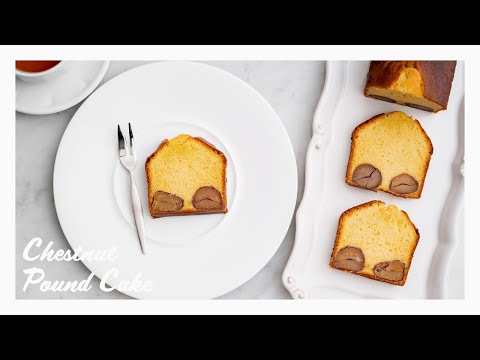
2021-09-25 05:45:01ラム酒香るしっとりほろりな栗の渋皮煮入りパウンドケーキ、栗のテリーヌです
【材料】
18cmパウンド型
・バター 100g
・きび砂糖orグラニュー糖 70g
・はちみつ 15g
・塩 ちょっぴり
・卵黄 2個
・全卵 1個
・薄力粉 60g
・アーモンドパウダー 30g
・ベーキングパウダー 2g
・栗の渋皮煮 8個
・ラム酒 適量
【準備】
・バターを室温で柔らかくする
・パウンド型に敷き紙を敷く
・栗の渋皮煮の表面のシロップをペーパーで拭っておく
・薄力粉、アーモンドパウダー、ベーキングパウダーはふるって使う
・オーブンを170℃に予熱する
【作り方】
1. ボウルに柔らかくしたバター100gをほぐし、泡立て器で砂糖70gをすり混ぜ、はちみつ15g・塩ちょっぴりも混ぜる
2. 卵黄2個を1個ずつ混ぜ、溶いた卵1個分も少しずつ加えて混ぜ合わせる
3. 薄力粉60g・アーモンドパウダー30g・ベーキングパウダー2gをふるい入れ、ヘラに持ちかえてさっくり混ぜ合わせる
4. 粉っぽさがなくなってツヤが出たら半分を敷き紙を敷いたパウンド型に詰め、栗の渋皮煮を並べる
5. 残りの生地を詰めて表面を均し、170℃に予熱したオーブンで40~45分、竹串をさして生地がついてこなくなれば焼き上がり
6. 粗熱が取れたら取り出し、お好みの量のラム酒を刷毛で塗り、ラップに包んで馴染ませて出来上がり
--------------------------------------------------------------------------
【動画でよく使ってる調理器具】
フライパン(20cm):https://amzn.to/2QyY1ny
フライパン(24cm):https://amzn.to/2UtNvz5
フライパン(24cm深型):https://amzn.to/3dj5DEp
鉄フライパン(22cm):https://amzn.to/3a8hqmR
アルミフライパン(24cm):https://amzn.to/3dj6tRz
片手浅型鍋(18cm):https://amzn.to/2QzGXha
片手浅型鍋(21cm):https://amzn.to/2U7ta3o
片手鍋(16cm):https://amzn.to/2QzCj2x
片手鍋(20cm):https://amzn.to/3bd0lZa
ソースパン:https://amzn.to/2U9keuI
まな板:https://amzn.to/2J1fQHI
ガスコンロ:https://amzn.to/3bdtvYa
牛刀:https://www.jikko.jp/fs/jikko/54803
ペティ:https://www.jikko.jp/fs/jikko/54800
撮影機材
カメラボディ:https://amzn.to/2xSXZAd
動画レンズ:https://amzn.to/3t7sfPB
写真レンズ:https://amzn.to/2U7HcCb
録音:https://amzn.to/2U9cGYT
※製品のURLはAmazonアソシエイトのリンクを使用しています
--------------------------------------------------------------------------
▼サブチャンネル(料理実験チャンネル)
https://www.youtube.com/channel/UCqIW0OHh8k2np5ZNz3wz8sg
▼ブログ
http://www.ikashiya.com/
▼Twitter
https://twitter.com/sakihirocl
▼Instagram
https://www.instagram.com/sakiyamahiroshi/
--------------------------------------------------------------------------
↓using translation software.
[Ingredients]
18 cm pound cake mold
・Butter 100 g
・Raw cane sugar or granulated sugar 70 g
・Honey 15 g
・A bit of salt
・Two egg yolks
・One whole egg
・Cake flour 60 g
・Almond powder 30 g
・Baking powder 2g
・Simmered Chestnuts (8)
・Rum, to taste
[Preparation]
・soften butter at room temperature
・Cover the pound cake mold with baking paper.
・Wipe the syrup on the inner skin of the chestnut with a paper towel.
・Sift weak flour, almond powder and baking powder.
・Preheat the oven to 170 °C.
[How to make]
1. Loosen 100 g of softened butter in a bowl, grind and mix 70 g of sugar with a whisk, and mix 15 g of honey and a bit of salt.
2. Mix 2 egg yolks one by one. Add 1 beaten egg little by little and mix.
3. Sift in 60 g of weak flour, 30 g of almond powder and 2 g of baking powder, and lightly mix it together with a spatula.
4. When the powdery feel is gone and the gloss comes out, cover half and stuff it in a pound cake mold covered with paper. Arrange the chestnuts simmered in their inner skins.
5. Stuff the rest of the dough and flatten the surface. Poke it with a bamboo skewer and bake it for 40 to 45 minutes in an oven preheated to 170 °C if the dough doesn't stick then it will be complete.
6. Take it out when it cools down. Brush it with your favorite amount of rum. Wrap it in a plastic wrap and it will be complete.![post-title]()
-
loosen 在 生かし屋 IKASHIYA CULINARY ART Youtube 的精選貼文
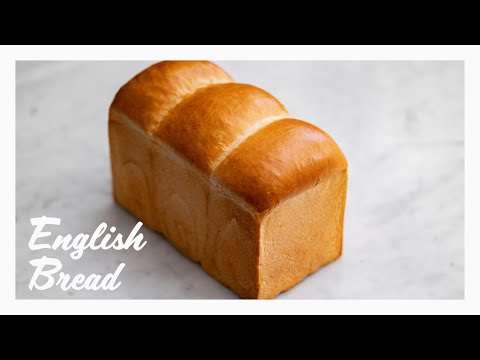
2021-09-03 10:36:29ストレート法で作る基本の山食パン(山型食パン・イギリス食パン)の作り方です
ストレート法は最初から材料をすべて合わせる作り方で、
メリット:短時間で出来る、風味が良い
デメリット:ボリュームが出にくい、でんぷんの老化がはやい=すぐぱさつく
という特徴があります
おすすめの強力粉は窯伸びの良い「スーパーキングやゴールデンヨット」、老化が遅く風味もいいし窯伸びもいいし作業もしやすい「ベルムーラン」がおすすめです(動画ではベルムーランを使用)
【型生地比容積について】
自分の持っている型に合わせて生地量を調整します
1.5斤と書かれてても1.2斤しかなかったり、型によって全然違うので必須です
この型と容量と生地の比率を型生地比容積といいます
型の容量÷型生地比容積=生地量
例:1625ml(1斤弱)÷3.5=約464g
3つに分けて入れる場合は1つあたり464÷3=155gになります
型生地比容積の目安
角食:3.8~4
山食:3.6前後
(数字が大きいほどふわふわで、数字が小さいほどみっちり)
ベーカーズパーセントと比容積からレシピの調整も出来ますが、
計算が面倒なので粉300gとか多めに作って生地量を食パンに使い
残りの生地は丸パンなどにすると楽だし無駄になりません
型生地比容積についてより詳しくは↓
https://www.ikashiya.com/entry/katakiji-hiyouseki
【材料】
ベーカーズパーセント(合計:194)
・強力粉 100
・砂糖 8
・スキムミルク 3
・塩 2
・インスタントドライイースト 1
・水 72
・バター 8
粉300での分量(1斤目安)
・強力粉 300g
・砂糖 24g
・スキムミルク 9g
・塩 6g
・インスタントドライイースト 3g
・水 216g
・バター 24g
【準備】
・バターを常温においておく
・型に離型油を塗る
【作り方】
1. 【生地作り~1次発酵】バター以外の材料をすべて合わせてグルテン膜が出るまでこね、バターを加えてさらにこねる
2. より薄いグルテン膜が出るまでこね(こね上げ26℃目安)、丸めてボウルに入れてラップをし30℃で60分発酵させて、打ち粉をして台に取り出す
3. 上から押さえてガスを抜いて広げ、上下左右から3つ折り×2で折りたたみボウルに入れてラップをし、30℃で30分発酵させる
4. 【分割~ベンチタイム】生地量の1/3ずつに分割してガスを抜き、きれいな面が外側にし表面を張らせるように丸める
5. かたく絞った濡れ布巾をかけて25分ベンチタイム(生地をゆるめて成形しやすくする/残った生地は同様にして丸パンなどに活用)
6. 【成形~2次発酵】めん棒で長方形にのばしつつガスを抜き(周りの気泡は手で潰す)、上下から1/3折りたたんで生地をくっつける
7. 奥から手前に少し張らせるように巻いてとじる(最初芯を作り、トップを持って下にくっつけるイメージで3回転~3回転半)
8. 離型油を塗った型に端→真ん中の順で入れ、蓋をして35℃で50分を目安に2次発酵(オーブンで発酵させる場合は予熱時間を考慮しはやめに取り出す)
9. 【焼成/180℃に予熱】生地が型のギリギリまで膨らんだら発酵完了、180℃に予熱したオーブンで焼成する
10. 180℃で30分を目安に焼き、焼き上がったら台に2~3回落として蒸気を抜き(腰折れを防ぐため)、すぐに取り出し冷ます
--------------------------------------------------------------------------
【動画でよく使ってる調理器具】
フライパン(20cm):https://amzn.to/2QyY1ny
フライパン(24cm):https://amzn.to/2UtNvz5
フライパン(24cm深型):https://amzn.to/3dj5DEp
鉄フライパン(22cm):https://amzn.to/3a8hqmR
アルミフライパン(24cm):https://amzn.to/3dj6tRz
片手浅型鍋(18cm):https://amzn.to/2QzGXha
片手浅型鍋(21cm):https://amzn.to/2U7ta3o
片手鍋(16cm):https://amzn.to/2QzCj2x
片手鍋(20cm):https://amzn.to/3bd0lZa
ソースパン:https://amzn.to/2U9keuI
まな板:https://amzn.to/2J1fQHI
ガスコンロ:https://amzn.to/3bdtvYa
牛刀:https://www.jikko.jp/fs/jikko/54803
ペティ:https://www.jikko.jp/fs/jikko/54800
撮影機材
カメラボディ:https://amzn.to/2xSXZAd
動画レンズ:https://amzn.to/3t7sfPB
写真レンズ:https://amzn.to/2U7HcCb
録音:https://amzn.to/2U9cGYT
※製品のURLはAmazonアソシエイトのリンクを使用しています
--------------------------------------------------------------------------
▼サブチャンネル(料理実験チャンネル)
https://www.youtube.com/channel/UCqIW0OHh8k2np5ZNz3wz8sg
▼ブログ
http://www.ikashiya.com/
▼Twitter
https://twitter.com/sakihirocl
▼Instagram
https://www.instagram.com/sakiyamahiroshi/
--------------------------------------------------------------------------
↓using translation software.
[Ingredients]
Bakers percent (total: 194)
・Bread flour 100
・Sugar 8
・Skim Milk 3
・Salt 2
・Instant dry yeast 1
・Water 72
・Butter 8
The amount of the flour 300.
・Bread flour 300 g
・Sugar 24 g
・Skim milk 9g
・Salt 6g
・Instant dry yeast 3g
・Water 216 g
・Butter 24 g
[Preparation]
・Leave the butter at room temperature.
・Spread mold release oil on the mold.
[How to make]
1. [Making the dough ~ primary fermentation] Mix all the ingredients except butter and knead it until the gluten film comes out. Add butter and knead it more.
2. Knead it (knead it up to around 26 °C) until a thinner gluten film comes out. Round it and put it in a bowl. Cover it with a plastic wrap and let it ferment for 60 minutes at 30 °C. Dust it with flour and take it out on a counter top.
3. Press down from the top to release the gas and spread it out. Fold it 3 times from top, bottom, left and right. Put it in a bowl and wrap it then ferment it for 30 minutes at 30 °C.
4. [Divide ~ bench time] Divide it to 1/3 of the amount of the dough then release the gas. Round it so the clean side is on the outside and the surface will stretch.
5. Cover it with a tightly squeezed damp dishcloth and bench it for 25 minutes (loosen the dough to make it easier to shape it/use the rest of the dough in the same way for round bread, etc.).
6. [Shaping ~ Secondary fermentation] Stretch it to a rectangle with a rolling pin and release the gas (crush the air bubbles around it with your hand). Fold it from the top and bottom to 1/3 and stick the dough together.
7. Roll it up and close it so that it is slightly stretched from the back to the front (Make the core first and hold the top and stick it on the bottom. Turn it around 3-3.5 times.).
8. Put it in the mold spread with mold release oil in the order of the edge to the center. Cover the lid and let it undergo secondary fermentation at 35 °C for around 50 minutes (take it out without considering the preheating time if you are fermenting it in the oven).
9. [Bake/Preheat to 180 °C] When the dough rises to the edge of the mold, the fermentation is complete. Bake it in the oven preheated to 180 °C.
10.Bake it at 180 °C for around 30 minutes. When it finishes baking, drop it on a counter 2 ~ 3 times to remove the steam (to prevent it from breaking around the waist). Take it out immediately and let it cool.![post-title]()
-
loosen 在 生かし屋 IKASHIYA CULINARY ART Youtube 的最佳貼文
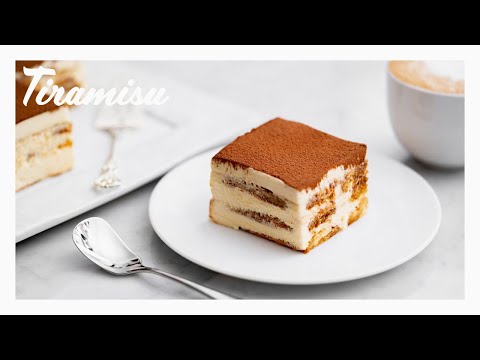
2021-07-17 06:00:06濃厚美味しい本格ティラミスの作り方
本格的な感じで作りますが、簡単お手軽な作り方も紹介しています
市販のビスケットでインスタントコーヒーを使い、卵黄なしでも作れますのでぜひ~
【材料】
サヴォイアルディ(市販のビスケットで代用可)
・卵黄 2個
・グラニュー糖(卵黄用) 15g
・卵白 2個
・グラニュー糖(卵白用) 30g
・薄力粉 50g
・粉糖 適量
ザバイオーネ
・卵黄 2個
・グラニュー糖 25g
・マルサラ酒(甘口) 40g
(ラム酒やアマレットなど他の洋酒でもOK)
ザバイオーネ・クリーム
・マスカルポーネチーズ 200g
・グラニュー糖 50g
・ホワイトチョコ(お好み) 20g
・ザバイオーネ 全量
・マルサラ酒 お好みの量
・生クリーム 150g
エスプレッソ液
・エスプレッソ(濃いめのインスタントやドリップコーヒーで代用可)
・グラニュー糖 お好みの量
・マルサラ酒 お好みの量
仕上げ
・ココアパウダーやコーヒーパウダー 適量
【準備】
・粉糖、薄力粉はふるって使う
・オーブンを180℃に予熱する
・クリームを作る少し前にマスカルポーネを常温に出しておく
【作り方】
1. 【サヴォイアルディ/180℃に予熱】ボウルに卵黄2個・グラニュー糖15gを泡立て器ですり混ぜる
2. 別のボウルに卵白2個を入れて白っぽくなるまで泡だて、グラニュー糖30gのうち半分を入れて泡立てる
3. ツヤが出てきたら残りのグラニュー糖を加え、角が立つまで泡立てメレンゲを作る
4. 卵黄の方にメレンゲの半量を入れてざっと馴染むまで混ぜ、薄力粉50gをふるい入れる
5. ヘラに持ち替えて粉っぽさが無くなる直前くらいまでさっくり切り混ぜ、残りのメレンゲを加える
6. あまり泡を潰さないように切り混ぜ、なめらかに混ざったら丸口金をつけた絞り袋に入れる
7. オーブン用シートを敷いた天板に棒状に絞り出し、粉糖を全体にふるいかけ、消えた頃にもう1回粉糖をふるいかける
8. 180℃に予熱したオーブンで20~25分を目安に、軽く色づくまで焼いて冷ましておく
9. 【ザバイオーネ】ボウルに卵黄2個・グラニュー糖25g・マルサラ酒40gを合わせて混ぜる
10. 鍋で加熱した沸騰しないくらいのお湯で湯煎にかけ、混ぜながら70℃程度まで温める(より殺菌を意識するなら80℃)
11. 温度が上がると泡が消えとろみつく、湯煎から外し好みでふんわり泡立ててもOK
12. 【ザバイオーネ・クリーム】ボウルにマスカルポーネチーズ200gをほぐし、グラニュー糖50gをすり混ぜる
13. 溶かしたホワイトチョコ20g・ザバイオーネをなめらかに混ぜ、好みでマルサラ酒も加え混ぜる
14. 生クリーム150gを軽く角が立つまで泡だて、↑に半量ずつ加えてなめらかに切り混ぜる
15. 【エスプレッソ液】エスプレッソor濃い目に作ったコーヒーに、好みでグラニュー糖・マルサラ酒を混ぜておく
16. 【仕上げ】容器にサヴォイアルディ(ビスケット)を敷き、エスプレッソ液を染み込ませる(もしくは染み込ませてから容器に入れる)
17. ザバイオーネ・クリームを入れて均し、エスプレッソ液を染み込ませたサヴォイアルディ→ザバイオーネ・クリームと重ねていく
18. 冷蔵庫で冷やし固め、仕上げにココアパウダーやコーヒーパウダーをふるいかけて出来上がり
--------------------------------------------------------------------------
▼サブチャンネル(料理実験チャンネル)
https://www.youtube.com/channel/UCqIW0OHh8k2np5ZNz3wz8sg
▼ブログ
http://www.ikashiya.com/
▼Twitter
https://twitter.com/sakihirocl
▼Instagram
https://www.instagram.com/sakiyamahiroshi/
--------------------------------------------------------------------------
↓using translation software.
[Ingredients]
Savoie Ardi (store-bought biscuits can be substituted)
・Two egg yolks
・Granulated sugar (for the egg yolk) 15 g
・Egg whites 2 pieces
・Granulated sugar (for egg whites) 30 g
・Cake flour 50 g
・Powdered sugar as needed
Zabaione
・Two egg yolks
・Granulated sugar 25 g
・Marusara Sake (sweet) 40 g
(You can also use other foreign liquors such as rum or amaretto.)
Sabaione Cream
・Mascarpone cheese 200 g
・Granulated sugar 50 g
・White chocolate (optional) 20 g
・Sabaione total amount
・Marsala Sake, as much as you like
・Heavy cream 150 g
espresso solution
・Espresso (strong instant or drip coffee can be substituted)
・Granulated sugar as much as you like
・Marsala Sake, as much as you like
Finish
・Appropriate amount of cocoa powder or coffee powder
[How to make]
1. [Savoie Hardy/Preheat to 180 °C] Mix 2 egg yolks and 15 g of granulated sugar with a whisk.
2. Add 2 egg whites in a different bowl and whip it until it becomes whitish. Add half of 30 g of granulated sugar and whip it.
3. Add the rest of the granulated sugar when it glazes. Whip it until it peaks to make a meringue.
4. Add half of the meringue to the egg yolk and mix it until it blends in. Sift in 50 g of weak flour.
5. Switch to a spatula and lightly mix it until the powdery feel is gone. Add the rest of the meringue.
6. Mix it so it doesn't crush the bubbles too much. Add it in a piping bag with a round cap when it mixes smoothly.
7. Squeeze it out into a stick shape on a baking sheet covered with baking paper. Sift the powdered sugar entirely. Sift it once again when it disappears.
8.Bake it in the oven preheated to 180 °C for around 20 to 25 minutes until it lightly browns then let it cool.
9. [The Baione] Mix 2 egg yolks, 25 g of granulated sugar, and 40 g of marsala sake in a bowl.
10. Boil it in hot water heated in a pot until it doesn't boil. Warm it to around 70 °C as you mix it (80 °C if you want to sterilize more).
11. The bubbles will disappear and thicken when the temperature rises. You can remove it from the hot water and whip it softly if you'd like.
12. [The Baione Cream] Loosen 200 g of mascarpone cheese in a bowl and mix in 50 g of granulated sugar.
13. Mix 20 g of melted white chocolate and zabaione smoothly. Add marsala sake if you'd like and mix it.
14. Whisk 150 g of whipped cream until it lightly forms peaks. Add half of it at a time to ↑ and mix it smoothly.
15. [Espresso liquid] Mix granulated sugar and marsala sake to your liking with espresso or strong coffee.
16. [Finish] Lay out the savoie aldi (biscuit) in the container and let it soak in the espresso liquid (or let it soak then put it in the container).
17. Add the Xabione cream and flatten it. Layer it with Savoiardi soaked with espresso then Xabione cream.
18. Chill it in the fridge to harden it. Finish it off by sifting cocoa powder or coffee powder and it will be complete.![post-title]()

loosen 在 Facebook 的最讚貼文
Welcome to the first episode of Lounge-LY! Have your drinks ready, loosen up your feet, and let’s get the party started! 💃🏻
#DJLokyii #LoungeLY #DJ #Livestream #HappyFriday #TGIF
loosen 在 Chris Leong Facebook 的最佳解答
❤️👉PART 2 VIDEO :
"Spondylitis", for more than 20 years .
https://direct.me/cl328
**(Usually spondylitis we only can loose only … later on patient need a lot excise for loosen up all the joint ) 🤗
👉 Part 1 video :
https://fb.watch/7rzmH2y-zk/
loosen 在 Chris Leong Facebook 的最讚貼文
This uncle suffers from "Spondylitis", which means inflammation in the spinal bones, or vertebrae for more than 20 years. Master Chris Leong explains how spondylitis form and helps to re-align back the uncle's bones issue. To see the full effectiveness of Master Chris Leong's re-alignment technique, make sure you catch the second part of this video as well.
https://direct.me/cl328
**(Usually spondylitis we only can loose only … later on patient need a lot excise for loosen up all the joint ) 🤗
👉❤️ PART 2 VIDEO :
https://fb.watch/7sccXJC977/