雖然這篇Greased鄉民發文沒有被收入到精華區:在Greased這個話題中,我們另外找到其它相關的精選爆讚文章
在 greased產品中有45篇Facebook貼文,粉絲數超過1萬的網紅Christian Yang (楊尚友),也在其Facebook貼文中提到, Recipe: Cookies and Cream Molten Chocolate Pineapple Bun Yahoo Video: link in bio 要發明啲新食譜真係好好玩今次就真係整咗啲又好味有Original 嘅菠蘿包. 包你煮俾自己食就拍手掌🤩. 菠蘿包脆皮材料Cru...
同時也有42部Youtube影片,追蹤數超過60萬的網紅Tasty Japan,也在其Youtube影片中提到,甘いかぼちゃとリッチなクリームチーズを掛け合わせた2層のチーズケーキ! ザクザク食感のシナモンクランブルがアクセントになっています♪ ぜひ作ってみてくださいね! かぼちゃチーズケーキ 12個分 材料: 溶かしバター 大さじ6 グラハムクラッカー(砕いておく)10枚 クリームチーズ(常温)905g...
「greased」的推薦目錄
- 關於greased 在 Christian Yang 楊尚友 Instagram 的最佳解答
- 關於greased 在 Charmaine Phua Instagram 的精選貼文
- 關於greased 在 Tasty Japan Instagram 的最佳解答
- 關於greased 在 Christian Yang (楊尚友) Facebook 的最佳解答
- 關於greased 在 食飽去旅行 Facebook 的最佳貼文
- 關於greased 在 Table 63. Facebook 的最佳解答
- 關於greased 在 Tasty Japan Youtube 的最佳貼文
- 關於greased 在 Tasty Japan Youtube 的最讚貼文
- 關於greased 在 Tasty Japan Youtube 的最佳解答
greased 在 Christian Yang 楊尚友 Instagram 的最佳解答
2021-09-03 18:11:52
Recipe: Cookies and Cream Molten Chocolate Pineapple Bun Yahoo Video: link in bio 要發明啲新食譜真係好好玩今次就真係整咗啲又好味有Original 嘅菠蘿包. 包你煮俾自己食就拍手掌🤩. 菠蘿包脆皮材料Cru...
greased 在 Charmaine Phua Instagram 的精選貼文
2021-08-03 12:55:42
Greased-up lightning tonight. 🌩 I guess staying in has its perks. 📷⚡️ Spent an hour taking slow-mo videos, and am pretty pleased with my returns! Th...
greased 在 Tasty Japan Instagram 的最佳解答
2021-08-03 11:44:31
ピンク色がキュート💓ラズベリーソルトキャンディ ㅤㅤㅤㅤㅤㅤㅤㅤㅤㅤㅤㅤㅤ 作ったら #tastyjapan をつけて投稿してくださいね!✨ ㅤㅤㅤㅤㅤㅤㅤㅤㅤㅤㅤㅤㅤ レシピはこちらをご覧ください♪ ㅤㅤㅤㅤㅤㅤㅤㅤㅤㅤㅤㅤㅤ ラズベリーソルトキャンディ 35個分 ㅤㅤㅤㅤㅤㅤㅤㅤㅤㅤㅤㅤㅤ 材料...
-
greased 在 Tasty Japan Youtube 的最佳貼文
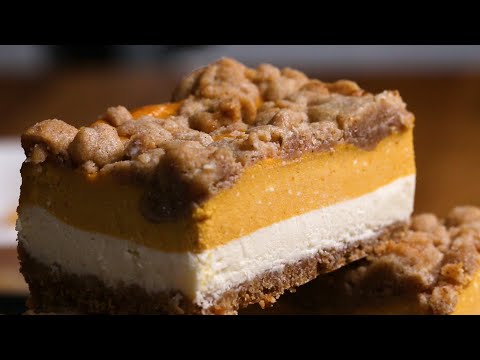
2021-09-23 10:00:16甘いかぼちゃとリッチなクリームチーズを掛け合わせた2層のチーズケーキ!
ザクザク食感のシナモンクランブルがアクセントになっています♪
ぜひ作ってみてくださいね!
かぼちゃチーズケーキ
12個分
材料:
溶かしバター 大さじ6
グラハムクラッカー(砕いておく)10枚
クリームチーズ(常温)905g
卵 4個
バニラエクストラクト 小さじ1
砂糖 300g
かぼちゃ(つぶしてピュレ状にしておく)425g
■トッピング用クランブル
バター 115g
薄力粉 125g
ブラウンシュガー 110g
シナモン 大さじ1
作り方:
1.ボウルに溶かしバターと砕いたグラハムクラッカーを入れ、よく混ぜる。
2. 23x33cmのスクエア型に(1)を入れ、カップの底で平たくする。冷蔵庫に入れて冷やす。
3. 大きめのボウルにクリームチーズ、卵、バニラエクストラクト、砂糖を入れ、滑らかになるまで混ぜる。
4.(2)のスクエア型を冷蔵庫から取り出して(3)を半分流し込み、冷凍する。
5. オーブンを160˚Cに予熱しておく。
6. (3)の残り半分にかぼちゃを入れ、よく混ぜる。
7. 冷凍庫から(4)を取り出し、(6)をのせる。へらで表面を平らにならす。
8. オーブンで30分焼く。
9. トッピング用クランブルを作る。ボウルにバター、薄力粉、ブラウンシュガー、シナモンを入れ、湿った砂のようになるまで混ぜる。
10. チーズケーキをオーブンから取り出す。(9)を振りかけ、てオーブンに戻して25分焼く。
11. オーブンからチーズケーキを取り出し、粗熱が取れるまで完全に冷ましたら、完成!冷蔵庫で冷やしたらさらに美味しくなります。
===
Pumpkin Cheesecake Bars
Servings: 12
INGREDIENTS
6 tablespoons butter, melted
10 graham crackers, crushed
32 oz cream cheese(905 g), at room temperature
4 eggs
1 teaspoon vanilla
1 ½ cups sugar(300 g)
15 oz pumpkin puree(425 g), 1 can
■CRUMBLE TOPPING
½ cup butter(115 g)
1 cup flour(125 g)
½ cup brown sugar(110 g)
1 tablespoon ground cinnamon
PREPARATION
1. In a medium bowl, combine the melted butter and crushed graham crackers. Stir until the mixture develops a wet sand texture.
2. Cover the bottom of a greased 9 x13-inch (23x33 cm) baking pan with the graham cracker mixture and spread evenly. Chill.
3. In a large bowl, combine the cream cheese, eggs, vanilla, and sugar. Stir until mixture is smooth.
4. Spread half of the cheesecake batter into the chilled baking pan, smoothing the top, and freeze.
5. Preheat the oven to 325˚F (160˚C).
6. Add the pumpkin puree to the remaining cheesecake batter and stir until incorporated.
7. Spoon the pumpkin cheesecake mixture over frozen cheesecake mixture and spread evenly.
8. Bake for 30 minutes.
9. Make the crumb topping: in a medium bowl, combine the butter, flour, brown sugar, and cinnamon. Stir until all ingredients are evenly incorporated and the mixture develops a wet sand texture.
10. Top the cheesecake with the crumble topping and bake for another 25 minutes.
11. Allow the cheesecake to cool at room temperature. For best results refrigerate overnight once completely cooled, then slice and serve.
12. Enjoy!
#TastyJapan
#レシピ
MUSIC
Licensed via Audio Network![post-title]()
-
greased 在 Tasty Japan Youtube 的最讚貼文
2021-05-21 10:00:06小麦粉は使わず、オートミールで体に優しいスイーツをご紹介します!
パンケーキにしても良し、ワッフルにしても良し♪
お好みに合わせて、ぜひ作ってみてくださいね!
オートミールで作るパンケーキとワッフル
4人分
材料:
オートミール 150g
牛乳 240ml
卵 大1個
バニラエクストラクト 小さじ1
ベーキングパウダー 小さじ1/2
塩 ひとつまみ
メープルシロップ (トッピング用)
お好みのフルーツ (トッピング用)
粉砂糖 (トッピング用)
作り方:
1. オートミールが粉状になるまでフードプロセッサーにかける。
2. 生地を作る。ボウルに牛乳、卵、バニラエクストラクト、(1)の粉状オートミール、ベーキングパウダー、塩ひとつまみを入れ、なめらかになるまでてよく混ぜる。
3. ワッフルを作る。予熱したワッフルメーカーに油を塗り、生地を約240ml流し込む。蓋を閉じて火が通るまで4分程焼く。
4. パンケーキを作る。テフロン加工のフライパンを中火にかけ、生地を約120ml流し込む。端が固まってきたらひっくり返し、裏面を2分程焼く。
5. お好みでフルーツ、メープルシロップ、粉砂糖をトッピングしたら、完成!
===
Oatmeal Pancake And Waffle Mix
for 4 servings
Ingredients:
1 ½ cups gluten-free oats(150 g)
1 cup milk(240 mL)
1 large egg
1 teaspoon vanilla extract
½ teaspoon baking powder
salt, to taste
maple syrup
assorted fruit
powdered sugar
Preparation:
1. Place the oats in the bowl of a food processor or blender and pulse until finely ground. Set aside.
2. In a large bowl, combine the milk, egg, vanilla, ground oats, baking powder, and a pinch of salt and whisk until well incorporated and smooth.
3. For waffles, pour 1 heaping cup of batter into a greased waffle iron set to high heat. Close the waffle press and cook until set, about 4 minutes. Carefully remove from waffle iron.
4. For pancakes, pour ½ cup of batter in a nonstick skillet over medium heat. Fry until the sides begin to set, then flip the pancake and fry the other side for about 2 minutes. Remove from heat.
5. Top the pancakes or waffles with maple syrup and fruit as desired.
6. Enjoy!
#TastyJapan
#レシピ
MUSIC
Licensed via Audio Network![post-title]()
-
greased 在 Tasty Japan Youtube 的最佳解答
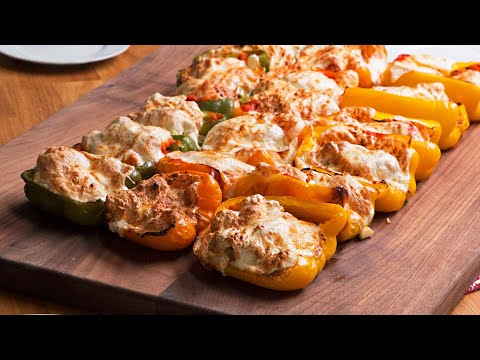
2021-04-29 16:00:23ピーマンの肉詰めのレシピをご紹介します!
鶏むね肉を詰め、上にモッツァレラチーズをのせてボリューム感を出しました!
赤、黄、緑のピーマンを使いとってもカラフル♪
美味しいので、ぜひ作ってみてくださいね♡
鶏むね肉でピーマンの肉詰め
15人分
材料:
オイルスプレー
鶏むね肉(角切り) 910g
塩 小さじ2
コショウ 小さじ2
オレガノ 小さじ2
ガーリックパウダー 小さじ2
乾燥ローズマリー 小さじ2
オニオンパウダー 小さじ2
薄力粉 250g
溶き卵 大6個
パン粉 345g
ピーマン(縦半分に切って種とワタを取り除いておく) 9個
マリナラソース 720ml
粉チーズ(パルメザンチーズ) 110g
モッツァレラチーズ(薄切り)905g
作り方:
1. オーブンを200°Cに予熱しておく。金網をのせた天板とオイルスプレーをした天板を用意しておく。
2. ボウルに鶏むね肉、塩、コショウ、オレガノ、ガーリックパウダー、乾燥ローズマリー、オニオンパウダーを加え、全体に行き渡るようにあえる。
3. 薄力粉、卵、パン粉をそれぞれ小さめのボウルに入れる。(2)を薄力粉、卵、パン粉の順に衣をつけて、金網の上にのせる。
4. 黄金色になるまでオーブンで25分程焼く。
5. ピーマンの切り口側を上にして、オイルスプレーをした天板に並べる。
6. ピーマンにマリナラソースを半量入れ、粉チーズを半量振りかける。(4)の鶏むね肉をいくつか入れ、残りのマリナラソースをかける。残りの粉チーズを振りかけ、スライスしたモッツァレラチーズを何枚か並べる。
7. オーブンで25分焼く。チーズが溶けてピーマンが柔らかくなったら、完成!
Chicken Parm-Stuffed Bell Peppers
for 15 servings
Ingredients:
nonstick cooking spray, for greasing
2 lb chicken breast(910 g), diced
2 teaspoons salt
2 teaspoons pepper
2 teaspoons dried oregano
2 teaspoons garlic powder
2 teaspoons dried rosemary
2 teaspoons onion powder
2 cups all purpose flour(250 g)
6 large eggs, beaten
3 cups plain breadcrumbs(345 g)
9 bell peppers, halved lengthwise, seeds and ribs removed
3 cups marinara sauce(720 mL)
1 cup parmesan cheese(110 g), grated
32 oz fresh mozzarella cheese(905 g), sliced
Preparation:
1. Preheat the oven to 400°F (200°C). Set a wire rack over a baking sheet. Grease another baking sheet with nonstick spray.
2. In a medium bowl, combine the chicken, salt, pepper, oregano, garlic powder, rosemary, and onion powder, and toss until evenly coated.
3. Add the flour, eggs, and bread crumbs to 3 separate medium bowls. Coat a few pieces of chicken at a time in the flour, then the eggs, then the bread crumbs. Once coated, transfer to the wire rack.
4. Bake for 25 minutes, or until golden brown.
5. Arrange the bell peppers, cut-side up, on the greased baking sheet.
6. Spoon half of the marinara sauce into the peppers. Sprinkle half of Parmesan over the marinara. Add a few pieces of chicken to each pepper, then spoon over the rest of the marinara sauce, and sprinkle with the rest of the Parmesan. Top each pepper with a couple slices of mozzarella.
7. Bake for 25 minutes, or until the cheese is melted and the
peppers have softened.
8. Serve immediately.
9. Enjoy!
#TastyJapan
#レシピ
MUSIC
Licensed via Audio Network![post-title]()


greased 在 Christian Yang (楊尚友) Facebook 的最佳解答
Recipe: Cookies and Cream Molten Chocolate Pineapple Bun
Yahoo Video: link in bio
要發明啲新食譜真係好好玩今次就真係整咗啲又好味有Original 嘅菠蘿包. 包你煮俾自己食就拍手掌🤩.
菠蘿包脆皮材料Crust:
含鹽奶油120g salted butter, room temperature
蛋黃2 egg yolks
糖150g sugar
麵粉120g flour
OREO 80g oreo cookies, processed
吉士粉5 tbsp custard powder
泡打粉1/2 tsp baking powder
水1 tsp water
蛋白2 egg whites, beaten for brushing
Molten Chocolate Cake for the centre
115g 黑朱古力Dark Chocolate (or any chocolate you like)
45g 牛油 Butter
¼ cup (25g) 糖粉 Icing sugar
2 tablespoons (15g) 朱古力粉 Unsweetened cocoa powder
2 雞蛋 eggs
For greasing the ramekins:
2 teaspoons 牛油 butter for greasing the ramekins
2 teaspoons 砂糖 caster sugar
Dough Ingredients:
Part 1 - Roux:
麵粉3 tbsp flour, 24g
奶1/4 cup milk, 60 ml
水1/4 cup water, 60 ml
Part 2 - 麵團材料Dough
麵粉2 1/2 cups flour, 325g
糖1/8-1/4 cup sugar, 25g-50g (depends how sweet you like your bread)
酵母2 tsp instant yeast, 7g (Christian 提供)
鹽1/2 tsp salt, 3g
雞蛋1 egg
奶1/2 cup room temp milk, 120 ml
牛油4 tbsp softened butter, diced, 56g
麵粉1/4 cup extra flour
Instructions:
Make the molten chocolate cake filling: In a bowl, melt the chocolate and butter (in the microwave, or gently in a pan or in a bowl over steam) cool slightly and then add the eggs and sifted icing sugar and cocoa powder.
Grease the ramekins and coat the inside with butter caster sugar.
Fill the ramekins to ½ full then wrap with cling film or aluminium foil. Bake in a 200C preheated oven for 8 minutes. Cool down and place in the freezer overnight.
For the dough, cook part 1 and mix well and set aside to cool.
Then make part 2, by mixing all the wet ingredients with the yeast, then mixing in the dry ingredients. Then mix in Part 1.
Knead and allow to rise for 1 hour.
Form into balls and place the chocolate in the centre and then allow to rise on a greased oven tray.
Make the crust by mixing all the ingredients together, form into a tube and wrap with cling film.
Then place in the fridge for 30 minutes.
Cut and the roll and then place on the dough balls, then brush with egg whites.
Preheat the oven at 180C
Bake for 18-20 minutes.
Serve hot!
greased 在 食飽去旅行 Facebook 的最佳貼文
🍡湯圓新吃法‼秒變脆皮巧克力白玉丸子💥
🌟食材與做法
湯圓,巧克力
1湯圓煮熟撈出過涼水,送入冰箱冷藏1小時
2巧克力加熱融化
3用牙籤挑起湯圓,裹上一層巧克力,放在油紙上,送入冰箱冷藏1小時
🍡A new way to eat glutinous rice balls‼ Crispy chocolate white jade balls in seconds💥
🌟Ingredients and methods
Glutinous rice balls, chocolate
1 glutinous rice balls are cooked and taken out of cold water, put in the refrigerator for 1 hour
2 Heat the chocolate to melt
3 Pick up the glutinous rice balls with a toothpick, wrap them with a layer of chocolate, place them on greased paper, and put them in the refrigerator for 1 hour
greased 在 Table 63. Facebook 的最佳解答
.
Hobak Jeon (Korean Pan-fried Courgette)
This healthy and delicious Korean side dish is one of the dish I really like but didn’t cook it a lot.
This only requires three ingredients: courgette,flour and egg. But It does take time to pan-fried them one by one.
How to cook:
❶slice the courgette and sprinkle some salt. The salt will draw out their moisture and will help the flour coating stick to them.
❷toss he slices in the flour.
❸then coat them with egg.
❹sauteed on both sides in a lightly greased sauté pan.
I usually dip them in Yuzu soy sauce. You can use your soy sauce and add some apple cider vinegar and sugar.
-
韓式煎櫛瓜.
這應該算是我好愛吃但很少做的小菜,因為好吃歸好吃,但是煎完一條櫛瓜,真的好花時間啊!
超簡單的只需要三樣材料:櫛瓜、麵粉、雞蛋。
櫛瓜切片後撒些鹽,表面開始滲出水珠的時候,就兩面沾麵粉,接著沾蛋液。就可以下鍋煎囉!
我自己喜歡吃脆口的櫛瓜,所以兩面蛋液上色後我就會夾起來。吃的時候沾上日本超市買到柚子醋醬油,略微酸甜,是超級開胃的小菜。
但是千萬要趁熱吃,很熱很熱的入口,美味度大增百倍!
這種不調成麵糊,而是沾蛋液煎的方式,成品的蛋香味明顯,因為不用太多油來煎,吃起來也相對清爽喔!
.
.
.
.
.
#foodphotography #foodblogger #koreanfood #recipes #vegitarianfood #nomeatmonday #cookingathome #cookbookauthor